
Let's see, how did this start last time. Ahh, right...
For two years now, my A/C hasn't really worked. At some point - 17 years after it was originally installed - it developed a slow leak. As spring turned to summer in 2018, I noticed that - as Nelly might say - "it's getting hot in herre," even as I cranked up the cold.from It's Too Damn Hot In Here - Fixing the A/C Evap Core
Well, I replaced the A/C evap core and things worked well for all of one week. While that sounds bad - and I guess ultimately it is - we counted our blessings that the end of the week was the same day we finished running the Nevada Backcountry Discovery Route (NVBDR) for the first time. With days over 100°F, we'd have suffered immensely had the A/C not held out as long as it did!
At any rate, with all the components in the cab of the truck replaced, I turned my sights on the next culprit - the A/C Compressor. Why the compressor? Well, when I'd charged the A/C system, the low pressure on the manifold acheived the correct pressures - around 32psi - according to the Factory Service Manual (FSM), but the high pressure side of the system never got quite as high as the FSM suggested it should - it got to ~125psi instead of 150-200psi. A bit of research indicated that this could be due to the compressor starting to go, and so that's where I was going to start.
Gathering Parts
Replacing the A/C compressor means I needed - obviously - need a new compressor. I had a couple reasonable options in this space - OEM or Denso:
- Toyota OEM - I could have gone Toyota-OEM-sourced here, but it's pricey. Personally, I recommend against it because the Denso option is a lot better. The OEM compressor does not come with a clutch, so you'll need to re-use your old one or buy a new one
- Denso A/C Compressor w/Clutch (471-1223) - Denso makes the Toyota OEM A/C compressor for Toyota, so this one is identical except for the box. Plus, it comes with a new clutch! Save a few hundred dollars and be just as happy? Yes please! This is the part I recommend.
- DEX/MERC ATF - 1qt - I needed this to refill the power steering pump after removing it, since some of the fluid in the reservoir was going to be lost in the process.
I also picked up a few other things for this job. I already had a kit with all of the o-rings I was going to run into from the last time I worked on the A/C system, and as I mentioned then, it's good practice to replace your Receiver/Drier any time you replace a major component of your A/C system. So, then, the following parts:
- A/C Receiver Drier (88471-34010) - I picked up yet another one of these.
- Santech MT2580 A/C System O-Ring and Gasket Kit - I already had this kit from my first attempt, and it has plenty of o-rings in it.
- A/C PAG46 Oil - 8oz - this oil is used to lubricate various parts of the system, which I already had on hand from last time.
- 10ml (10cc) syringe - used to measure the right amount of PAG46 oil into the system; again, already on hand.

I also - of course - would need to charge the system again, but I already had everything for that, and I've covered how to do that over here, so I won't list it all again: Charging the A/C System on a 1st Gen Tacoma (or 3rd Gen 4Runner).
Doing the Job
What follows here is the saga of my specific repair. If you're interested in the step-by-step, with lots of photos version of this job, check out
Replacing the A/C Compressor on a 5VZFE
(Tacoma, Tundra, 4Runner)
This time, instead of starting with the Receiver/Drier, I got started with something that's not a part of the A/C system at all. Two somethings, actually! First, I removed the air intake box, so I'd have a bit of room to work. This is just three bolts, a couple hose clamps, and unplugging the MAF, so it went reasonably quickly.
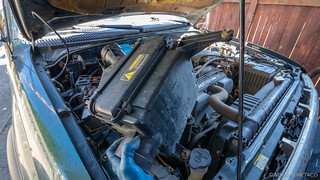
And with the air intake box removed, the next order of business was to remove the Power Steering Pump. See, on a 5VZFE engine, the A/C compressor has to come out the top of the engine compartment. And, the power steering pump is in the way of that being an easy process.
I loosened all the requisite nuts and tensioning bolts to remove the belt that drives the power steering pump, and then disconnected the hoses from the pump. As one does, I spilled power steering fluid - actually automatic transmission fluid (ATF) - everywhere during this process.


That of course meant that I spent nearly as long cleaning up my mess as I'd spent on the pump removal itself. Fun times. Good practice, I guess.
So, with the power steering pump removed, I repeated a similar process with the A/C compressor - except that it was a lot cleaner, since the A/C system was completely discharged at this point, with nothing to leak out of the lines as I removed them from the compressor.

Success!

Looks similar, I probably muddled my way through getting the right part.
Transferring the top plate from the old compressor to the new, draining the oil that shipped in the compressor and refilling it with 125cc of PAG46 oil, and replacing all the gaskets and o-rings was the next order of business. All that went smoothly and before long I was ready to put everything back together.

For anyone who's ever had a Toyota FSM, we all know that putting things together is significantly simpler - at least to write about - than removal. It's simply the reverse of removal. 

This time though, everything was reasonably straight forward, and in an hour or so, all the belts were tightened, and I was pulling a vacuum on the system and hoping that everything checked out.

I couldn't believe it after the last saga I had with holding vacuum, but this time it held the very first time. Celebrate? Why yes, thank you!
So, with the help of @mrs.turbodb in the cab - keeping the revs at 1500RPM - I proceeded with Charging the A/C System. With previous experience this seemed to go well enough, and the pressures on the manifold climbed into their FSM specified ranges as I filled the system with the specified amount of R134a - more success!
And with that, as a "glass-half-full" kind of guy, I probably should have considered themselves done and happy. But, I'm not - because I'm not sure the saga is over. Here's why. Three reasons:
- The A/C still isn't blowing as cold as I'd expect. It's cool, for sure - blowing around 58-60°F on an 85°F day - but my 3d gen 4Runner blows air in the 52-53°F range on the same day.
- The sight glass in the A/C Receiver/Drier isn't acting quite as I'd expect. During normal operation, it appears reasonably clear - well, yellow due to the UV dye that's in the system - which is correct. However, when I shut down the engine, the FSM states that it should bubble momentarily and then go clear again. As far as I can tell, it does not - it stays yellow. The FSM suggests that this means there's too much refrigerant, but I'm quite certain the correct amount is in the system, and the pressures on the manifold are correct. I am confused.
- When I went out to check on the system a couple days later, and I unscrewed the valve stem cover to the high pressure access port, I could swear I heard the smallest amount of pressure leak out. I filled the port with some soapy water to look for bubbles and there were none, but I'm still a bit on edge about hearing pressure there. A(nother) leak?
So, A/C experts - internet or otherwise - with those three concerns I still have - what do you think? Let me know because right now, I'm just in wait-and-see mode to see if this thing is fixed. And I don't love wait-and-see!
Read the Whole Saga

Just finished reading and those old pressure valves can be fussy. I think you should pump down your system without any refrigerant in the system. Leave your gauges on and let it sit for 24 hrs if you can. I’m guessing you’ve either got a leak at the valve where you attach to add gas or there’s a pin hole somewheres in the lines. Also check the flares where the lines attach to the pump. Any signs of cracks in the flares will seem to hold pressure but will let out gas as it expands and contracts with temperature. Another thing you can do is get some leak detection spray from your local HVAC supplier. It’s like soap but will stay on the joints and lines and show bubbles for quite a long time after application. Up to 6 months in building HVAC systems. Likely less for a vehicle. Hope this helps. Leak seal blue or Cal Seal are common products. One last thing. If you end up taking the lines off again to check the flanges there’s a sealant that’s you can put on them called Nylog Blue.
Thanks Phil - these are all great suggestions. If I find that it's not holding pressure in the coming months, I'll definitely be doing some of these things! Checking the flares is something I never thought of - I figured if I didn't see any UV dye, they must be doing OK. 🤷♂️