
June 17, 2021.
I've used a fuel siphon ever since I switched from carrying extra fuel in Rotopax to using Scepter Military Jerry Cans. Siphons make the whole process easy - fuel cans don't need to move from their storage location in order to refill, and there's no risk of spilling fuel down the side of the truck or on the ground. The only drawback I've heard is that draining a 5 gallon jerry can takes three minutes instead of 45 seconds with a spout. But seriously, who is in that kind of rush?
There are a plethora of fuel siphons available for purchase, and since I've just recently switched to my third (and I'm quite sure - again - final) siphon, I realized that a lot of folks may start down the path the same way I did. Hopefully this post can save some trouble!
My First Mistake
The first fuel siphon I purchased was a 6-foot-long siphon. I bought the cheapest one I could at the time - after all, they couldn't be all that different, right? It siphoned well enough, but 6' is simply too short. Unless the fuel can is immediately next to the fill neck, the siphon won't reach. So, that means if the jerry is across the bed or on a swing-out bumper, it needs to be moved for use with a 6 foot siphon.
My Second Mistake
Learning from my first siphon, I reasonably quickly bought a longer 10-foot siphon. This was most definitely better than the six foot option. Long enough to reach across the bed or to the swingout, this siphon was seriously convenient.
The problem with ordering a 10-foot siphon online is that the hose is never very high quality - the plastic material is usually too rigid, especially at low temperatures. Even worse, the hoses often arrive kinked, and those kinks are near impossible to remove, often leading to cracks and leaking fuel. I got about 2 years out of mine before it started leaking.
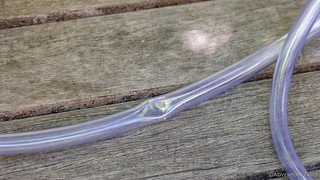
The worst thing that can happen to a siphon is a kink. And many are delivered this way.
The Best Option
The best option is to make your own siphon. If you've previously bought a 6- or 10-foot siphon, the cost of this option is actually quite similar to a 10-foot siphon. If you haven't, then the additional cost is about double - but, it's totally worth it.
To make a siphon, you need:
- A jiggle valve. If your 6- or 10-foot siphon has a ½" inside diameter tube, you can just cut it out and use it with your new tubing. If not, you can get a pack of valves and make some siphons for your friends at the same time!
- A quality hose. The best I've found is a 1/2" ID, 5/8" OD fuel safe extra flexible tube recommended by Dan @drr and is from McMaster-Carr. Get a 10' (or 25') for one siphon, or more if you're making some for friends.
- A heat gun or hair drier.
If you're re-using the valve from an old siphon, carefully cut it out with a utility knife. Do your best to not score the metal casing at all, since you want it to make a good seal with the new tube.

Cannibalize a free part that will work just as well as a new one!

Ready to go.
Using the heat gun, slowly warm 2- to 3-inches of one of the ends of the flexible tubing, being careful to stay far enough away that it doesn't melt. Once it has warmed up enough, you can push the barb fitting of the jiggle valve into the tubing until it is fully seated. This might be a little difficult, as the tubing will be difficult to manipulate, but have patience and you'll be fine.

Apply just enough heat and then manipulate the tube over the valve.
When you're done, you'll have a siphon that looks like all the others, but the tubing will be significantly better (more flexible and easier to coil) and kink-free (even when tightly coiled). And that is a recipe for success.

Ready for years of service!