
It's not natural. It's uncomfortable. It's hard. And, I know it's the right thing to do - I want to find a way to cut some weight off of the Tacoma.
When I purchased the truck, Toyota listed the curb weight of a 4WD SR5 V6 Xtracab at something right around 3,500 lbs, and the gross weight (GVWR) at something near 5100 lbs. Or at least, that's what I can find on the internet in 2019, since I wasn't at all interested or concerned with those numbers at the time. Unfortunately for me - and the truck - when I roll it onto a scale on the side of the highway, the numbers I see today are a little different. Fully loaded, it weighs in right around 5800 lbs, or 700lbs over Toyota's max GVWR!

Of course, I've done various things to try and account for the additional weight, like upgraded ADS suspension, reinforcing of the rear frame, etc. but still - if at all possible, I'd like to get the truck a little lighter. My goal is to drop 500 lbs.
Impossible you say?
Yeah, probably. Let's get started.
Trimming the Butt End
My first order of business was doing some work on the rear bumper. Ever since I installed the CBI Outback 1.0 bumper, I've wanted to get rid of the Hi-Lift mount on the driver side swing-out. I've got my Hi-Lift mounted to the bed rack, and the tall triangular shape of the swing-out crowds my side mirror.

I've never really summoned up the courage to cut into the powder coat on the bumper, but figured that this was as good a reason as any. So,  !
!
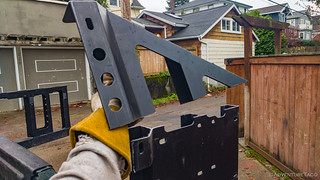
A bit of welding and painting to finish off the new top edge and I was done. And look, progress! 7.25 lbs down, 492.75 lbs to go!

Flush with success, I decided I'd make one more modification to the bumper. See, CBI makes some parts of their bumpers adjustable - this is understandable, since they sell to thousands of people. The spare tire carrier is one such piece, where two pieces of 3/16" steel overlap for about 3", allowing the mount to adjust for tires with varying amounts of backspace.

Well, I'm not planning to change my wheel or tire size any time soon (despite the prodding I get from my buddies who want me to go back to SCS wheels, and of course install 35" tires  ), so I figured I could cut out the overlap and just weld up the spare tire mount. Worked just fine, and saved me another cool 2 lbs.


Fabbing a New Top Plate for the Jerry Cans
Long time readers may recall that I lost the top plate that secured the Jerry Can's way back at the beginning of The Re-Tour. Luckily, Dan @drr happened to see it fly off on the highway, and picked it up for me, though a little worse for wear.

Well, I lost it a second time on our most recent trip to Death Valley, and this time Dan wasn't there to pick up after me. So, I needed something that would keep the Jerry Cans from bouncing out of the rack, and figured it was a good time to make it a little lighter as well. Unlike the original plate, I decided that I'd allow myself the convenience of filling (and siphoning out of) the cans without removing the plate. This does mean that someone else could do it if I were away from the truck, but with how tight the lids get, I'm not all that worried. Weight savings was a whopping 2.1 - .44 lbs, for a total of 1.66 lbs!

Modifying the Battery Box
OK, so Monte @Blackdawg was sure that this thing was going to fall apart on the trail when I initially built it. Of course, it hasn't, and it's a prime candidate for a little trimming. Made of ¾" plywood, it's heavy - and plywood is so structural that I can turn a lot of it into webbing and still have the cabinet be more than strong enough.

After taking it all apart and cutting out numerous windows, I put everything back together and I'm sure the truck will now be light enough to just float away. Or not. But hey, every 5.4 lbs count!

Who Needs and OSK When You Can Have a No-SK?
I'll be the first to say - I'm not sure this is the smartest move, but my hope is that history is a good indicator of the future, and that if anything does go wrong, I'll be able to limp to wherever I can get a tow and then use my wallet to replace whatever I'm no longer carrying. Additionally, I want to work with my adventuring pals to figure out how we can each bring some things instead of each bringing every thing. Because really, we don't need 3 axles, and we're unlikely to need 6 LBJs on a trip.
Currently, I carry a whole lot of tools and parts, spread out across different areas in the truck. Let's take stock of what I've been carrying:
- The OEM screw jack and associated spare tire changing tools, in the Xtracab cubbies.
- My tool roll - which contains all the tools I use on a regular basis for truck maintenance. Details of the roll covered in Gear Roundup - What I Take With Me On Trips (2018 edition).
- The actual OSK. This is generally what I consider to be "backup" stuff that hopefully never gets used on a trip. Again, contents in last year's Gear Roundup; I haven't made any significant changes.
Some of this stuff needs to stick around for sure. I think I've used every tool in the tool roll, so that's staying in the truck at all times. The bottle jack (and associated tools) on the other hand - is nice to have in some specific circumstances to use mostly as a press, but I've never used it as such on the trail so it's no longer in the truck. The Hi-Lift is the thing I use to change a tire now. So, that's 11 lbs - pretty good.

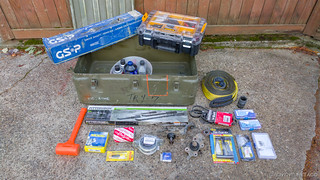
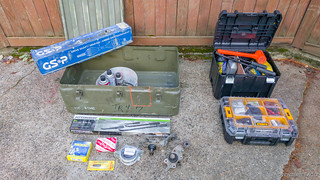
So now for the OSK. There are two components to the kit that I need to consider - first, the contents. It contains a myriad of things that I have used on trips (either for myself or others), so it's not as easy as just dumping the whole thing. The second component of the kit is the military medical case (ebay) itself. It's big, and while it fits the current contents well, I could save some weight by downsizing.
After giving it a bunch of thought, here's how I've decided to downsize the OSK. My thinking is that I'll keep the recovery gear and most of the tools to work on the vehicle, but that I won't keep things that I could limp to town without. That means I might not be able to perform an on-trail fix that will keep me going on the trip, but the reality is that I was covering so few of those cases anyway that it probably wasn't worthwhile.
| Leave Behind | Keep |
| The theme here is that these are nice to have, but not necessary on the trail. I can wait until I'm in town (or home) to buy/use them.
Tools
Consumables
Parts
|
Recovery
Tools
Consumables & Parts
|
Luckily for me, by removing the parts and fluids, everything fits in a much smaller, lighter, DeWalt Toolbox.
So, here's what is staying at home - and what I'm keeping. The original OSK weighed in at 102 lbs, and the slimed down version is only 39 lbs - a savings of 63 lbs!
Who Really Needs a Fridge?
We do; the fridge is staying.
But, it's a question worth considering for sure, because the fridge is responsible for more weight than it might initially seem. There's the fridge itself of course, but then there's also the spare (aka "house") Northstar 24F AGM Battery, the battery box, and all the wiring for the dual battery system. That's just the electronics; I also have my poor-man's bed slide, which adds to the weight as well.
I already minimized the battery box, and there's nothing I can do about the wiring for the house battery. I can however work to minimize the weight of the bed slide by taking the same approach I took with the battery box. To the tune of 5.4 lbs.

What's in the Glovebox?
If you're anything like me, junk gathers in the glove box. Sure, that old registration and insurance card doesn't weigh much, but I'm removing the following items:
- An old Samsung Galaxy Tab A 8.0" tablet
- An old Google Nexus 7 tablet
- A weird small first aid kit
- Some papers
It's not much, but hey, just like the tire carrier on the rear bumper - every 1.75 lbs counts.

Bye-bye Parts of the @turbodb fab Bed Rack!
The bed racks I make are - in general - a great compromise between beef and weight. The standard rack weighs in at right around 48 lbs, and is more than strong enough to support over 1000 lbs (not that I'd recommend doing that to your bedsides)! The way I use the rack however, it's overkill - and here's how:
- I don't need three legs on each side - two would support more than enough weight.
- I only ever mount the @Cascadia Tents (CVT) RTT to the rack. As such, I don't need all of the webbing on the platform.
A little cutting, grinding, and paint later... the bed rack is 7.75 pounds lighter. Note: I could really lower the rack about 2" as well, which would be good for both center of gravity and aerodynamics. Perhaps a project for later.

Downsizing the Kitchen
I've already downsized the kitchen a couple of times in the past after I realized that carrying around a full-size Weber Q100 Grill probably wasn't the best idea. Like the OSK, the kitchen has two components to it - the contents and the storage container - another military medical case (ebay).
Here's what I'm no longer taking with me... a single pan. After looking through everything in the box, I realized that I use everything else on a regular basis - and weight loss is about being smart, not making life difficult. Additionally, the case is staying for now, because it makes packing the bed so much easier. So, only a 2.3 lb savings from the kitchen. 

So, total weight loss for the Tacoma this winter...at least until I decide some of this stuff is invaluable.

Trimming the Bumper - 10.91 lbs
Modifying the Battery Box - 5.40 lbs
Downsizing the OSK - 74 lbs
Trimming the Bed Slide - 7.5 lbs
Emptying the Glove Box - 1.75 lbs
Cutting Down the Bed Rack - 7.75 lbs
Reducing the Kitchen - 2.3 lbs
A whopping 109.61 lbs lost! Not quite the 500 lbs I was going for.
While it may only be 100 pounds out of 500, it's just over 20% weight loss reduction 😉
Always enjoy your write ups and adventures!
Jareb aka MtnClimber - Owner/Operator of Northeast Overland
Thanks Jareb! The 100 lbs is definitely better than nothing, and I like you're way of looking at it by comparing it to the 500 lbs :). I'd been comparing it to the overall weight, where it's more like a 2% reduction, LOL.
Just throwing something out here...I question the need for the heavy as heck CBI bumper. A Wilco tailgate replica (self made) would give you the tailgate function, the spare tire carrier And could also carry the fuel cans if you modify the carrier you have to fit on the tailgate. Then a lightweight tube bumper below for protection....I bet you could save 100+ lbs that way... The CBI is a cadillac, and you want a pinto 🙂
I could be way (weigh?) off, but it seems like a reasonable idea to me if losing bulk is your goal. (Of course, I'm not the one doing the hack job on the truck either!!)
Thanks for sharing your adventures!!
It's a fair consideration for sure. When I installed the CBI bumper, I compared it's weight to the OEM bumper + trailer hitch - only 70 lbs difference. So, that's all I'd have to work with if I put the OEM one back on... which is one of the reasons I haven't gone that route and done something like you suggested!
If a pinto left the factory with a CBI rear bumper it would prob. still be in production
LOL. The bumper is a nice product. Unfortunately, I wish I could say the same about the customer service, but I've had two bad experiences there now.
First was when I purchased the bumper and picked it up at CBI. It was a cold and snowy day and even though no one was there and I'd driven from WA as part of a longer trip to Canyonlands, they were really upset that I installed the bumper in their parking lot. Turns out I was lucky that I did, because several pieces were missing! (see Installing a Dual Swingout CBI Outback Rear Bumper)
Second was just a couple weeks ago on a trip report I'm going to start posting next week. A piece of the bumper broke (swing-out arm latch), and I didn't have a great experience with them getting a replacement. (see Rig Review: Death Valley and Mojave 2019. Note: this will 404 until I post the report)
If you havent done so already, i would look into rim/tire setup. Aluminum rims with less ply tires could save a lot weight on each wheel. The steelies, bead locks, and +10 ply tires most people have are not necessary unless extreme rock crawling.
Hey Sach,
My wheels are already aluminum alloy, but I'm with you on the tires. Unfortunately, in the size I like - tall and skinny 255/85R16 - the only real option are E-load tires. Boy, I really wish I could find some C's because I hate the ride quality of the E's (in addition to the weight). Alas, I've yet to find any. Seems all the vendors are focusing on 17"+ wheel sizes these days, for the mallers.
I suggest you wash and scrape all the mud and grease off the bottom of your truck and lose another 100 pounds. UJ
Hahahahaha, I wish it were that easy!