
First gen Tacoma's don't see much love from the fabricators these days. It's understandable, really - these trucks are getting older and there aren't as many out there as 2nd and 3rd gen Tacoma's. Plus, those of us that own 1st gens are cheap - that's part of why we're still running these older trucks!
Knowing that this was the case even a few years ago, I eagerly awaited a sale to purchase a rear diff skid from Jerry @JLee and the good folks over at Bay Area Metal Fabrication (BAMF). One came along for Black Friday, and despite the several-hundred-buckaroo-even-with-a-discount price, I scooped one up - because I knew it wouldn't be around much longer, I knew it'd be a quality part, and I liked the idea of supporting BAMF.
It arrived, and it was beautiful. I put it in the living room awaiting installation. And that was two years ago.
I held off on the installation for a couple of reasons, but the only one that really matters is that I didn't feel like there were any trips that would require it, or that would put my rear diff at risk. However, this fall we have a group trip to Colorado in the works, and knowing how these trips trips go, I wanted a little extra protection, so to speak.
Plus, the Tacoma is getting old, and we all know that when you get old it's not uncommon to start wearing a (diff) diaper. 
Installation looked straight forward enough. Jerry sent the skid with three brackets and six bolts - everything I'd need to get it installed.

Figuring it'd only take a few minutes to install, I got started by holding it in place and loosely threading in the bolts for the two brackets that secure the skid to the axle housing. One of these required bending a bit of brake line to get the bracket to clear, but otherwise went off without a hitch.

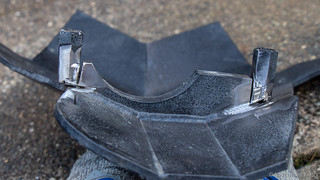
The last thing to do - before tightening everything down - was to position the front bracket. This one is supposed to fit over a rectangular casting on the 3rd member, but for some reason mine seemed to be positioned a little too far forward, the bracket contacting the 3rd member right around the pinion seal. It would probably be OK, but I didn't love it.

The solution required a small modification of the skid plate, but wasn't hard by any means. All I needed to do was to partially cut off the nuts into which the bolts that secured the front bracket threaded, bend/tilt them back slightly on the skid plate, and re-weld them into place. I did much of the welding with the skid plate on the truck, just to ensure that whatever alignment I ended up with would fit my configuration correctly.

A bit of paint - which on a skid like this will probably need to be refreshed each year - and everything was good to go. I still won't run this skid all the time - there's no point in hauling it's beefy, badass, ¼" steel self around - but it sure is nice to know that I have it if I need it!