")
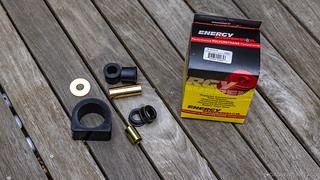
Over time, rubber bushings wear out and need to be replaced. This happened for me recently when I Replaced All the Bushings on my Tacoma, and I figured that others could benefit from a quick little guide that shows the entire process and lists all the necessary parts for replacing the bushings in the steering rack.
Parts
One thing to be aware of when replacing the steering rack bushings is that 1st gen Tacomas have two different bushing configurations depending on the model year - with the change happening around the 2000 model. Earlier trucks - it seems - use a smaller diameter bolt at the center location to secure the actual rack (which is the same across all years) to the frame, while later years use a larger diameter bolt. Luckily, the good folks at Energy Suspension have included sleeves for both in this kit, as long as you purchase the kit for the '95-00 model years, regardless of the actual year of your 1st gen Tacoma.
- Energy Suspension 8.10101G Steering Rack Bushing (Black)
- Energy Suspension 8.10101R Steering Rack Bushing (Red)
Note: Energy Suspension also has a separate kit for the '01-04 model years (8.10103 black | red). This kit is identical to the '95-00 kit but contains only the sleeve for the larger diameter bolt. Personally, I think it's a better idea to buy the '95-00 kit regardless, to give yourself the flexibility.
Tools
The tools for this job are relatively simple.
- OTC 6295 Front End Service Set - the smaller pitman arm puller is used to disconnect the OTRE when removing the steering rack.
- OTC 7249 Ball Joint (and U-Joint) Service Kit - used to press the bushings out of the steering rack.
- Misc sockets (I recommend this set from Williams, a Snap-On brand)
- 12mm socket - sway bar mount, steering rack removal.
- 14mm socket - sway bar end link removal.
- 19mm socket - steering rack removal.
- 21mm socket - to remove lug nuts.
- 22mm socket - OTRE castle nut removal, steering rack.
- Ratchet, Extensions, as necessary.
- Breaker Bar
- Torque Wrench.
- Quick drying solvent cleaner (brake cleaner, etc.)
- Grease to lubricate the new bushings.

Doing the Job
With the parts and tools in hand, it's time to get started.
General Preparation
- Using a floor jack and jack stands, support the front of the truck on the frame with both front wheels completely off the ground.
- Remove the wheels.
- Lock the steering wheel. This is necessary in order to maintain correct steering wheel orientation once the steering rack is removed in order to access the bushings.
- Make sure the parking brake is on, and at least one rear tire is chalked.
Removing the Sway Bar to Access the Steering Rack
For photos of removing the sway bar, see Remove the sway bar and sway bar end links. If you will be reinstalling your sway bar, now may be a good time to replace your sway bar and end link bushings as well with an Energy Suspension kit:
- Tacoma - kit 8.5118 w/27mm bushings (black | red)
- 4Runner - kit 8.5117 w/26mm bushings (black | red)
- Use a 14mm socket to remove the nut on the top of the sway bar end link.
- Remove the washer and bushing and set them aside.
- Repeat for the opposite side.
- Use a 12mm socket to remove the two (2) bolts securing the sway bar brackets to the frame.
- Repeat for the opposite side.
- Remove the sway bar.

Disconnecting Outer Tie Rod (OTRE) from the Lower Ball Joint (LBJ)
In order to more easily move the steering rack when replacing the bushings, it's beneficial to disconnect the rack from the LBJ.
- Remove the cotter pin from the OTRE castle nut.
- Use a 19mm socket to loosen the castle nut securing the OTRE to the LBJ.
- Use the smaller Pittman Puller in the OTC 6295 Front End Service Set to separate the OTRE and LBJ. Note: leave the castle nut loosely threaded onto the OTRE when you do this, and it will keep the joint from exploding when it's pressed out.

Removing the Steering Rack
The steering rack is secured in three locations.
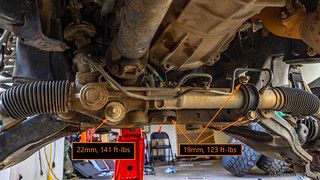
- Use a 19mm socket to remove the lower nut and upper bolt for the passenger-side bracket that secures the steering rack to the cross member. Then set the bracket aside.
- Use a 19mm socket and breaker bar to remove the center bolt securing the steering rack. Note: The bolt points towards the ground and is accessed from the above the steering rack. The lower nut is a welded nut and cannot be loosened.
- Use a 22mm socket and 22mm wrench to remove the driver side bolt and nut securing the steering rack. Note: If you have a differential drop kit, it may need to be removed in order to fully remove the long bolt.
- Using a 12mm socket, a wobble, and the necessary extensions, remove the bolt securing a bracket that secures the power steering lines to the frame. This will allow more/easier movement of the steering rack for bushing replacement.
Note: you can also remove the driver side splash guard in the wheel well and then reach over the frame to access this bracket without all the extensions.

- The steering rack is now loose and can be wiggled off of the mounts to access the bushings.
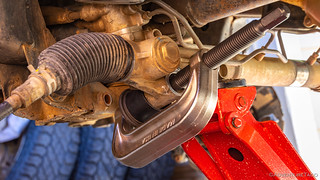
Removing the Driver Side Bushing
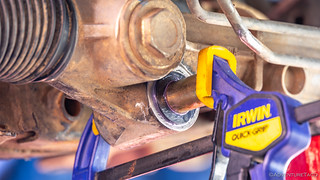
- With the the front driver side of the steering rack accessible, position a large receiver cup on the front side of the rack to capture the bushing as it is pressed out of the rack.
- Place the large C-clamp from the OTC 7249 Ball Joint (and U-Joint) Service Kit around the receiver cup, with the foot of the screw on the inner sleeve of the bushing.
- Tighten the clamp in order to push the bushing toward the front of the vehicle and into the receiver cup. Note: reset as necessary in order to avoid contact between the screw of the c-clamp and the steering rack.
Removing the Center Bushing
- With the the center bushing of the steering rack accessible, position a 32mm socket or appropriate receiver cup on the top side of the rack to capture the bushing as it is pressed out of the rack.
- Place the large C-clamp from the OTC 7249 Ball Joint (and U-Joint) Service Kit around the receiver cup, with the foot of the screw on the inner sleeve of the bushing.
- Tighten the clamp in order to push the bushing toward the front of the vehicle and into the receiver cup. Note: reset as necessary in order to avoid contact between the screw of the c-clamp and the steering rack.

Cleaning the Steering Rack
At this point, all of the bushings are removed.

Use a quick-drying solvent of your choice to clean the areas of the steering rack where the bushings were installed. Be sure to remove any old rubber, dirt, and oil from these areas prior to installing the new bushings.

Installing the Bushings
The driver side and center bushings are each made of two pieces that slide into each side of the steering rack before inserting a metal sleeve.
- Coat the outside of the driver bushings with lubricant to make installation easier and reduce squeaking during operation.
- Slide the driver side bushings into the steering rack.
- Coat the inside of the driver side bushings with lubricant, as well as the outside of the driver side metal sleeve.
- Slide the metal sleeve into the bushing, using the C-clamp if necessary.
- Coat the outside of the center bushings with lubricant to make installation easier and reduce squeaking during operation.
- Slide the center bushings into the steering rack.
- Find the metal sleeve that matches the original inner sleeve of the original center bushing most closely; this is the sleeve you will use. Note: This is the reason to order the '95-00 kit, so that you have the option of sleeves at this point.
- Coat the inside of the center bushings with lubricant, as well as the outside of the center metal sleeve.
- Slide the metal sleeve into the bushing, using the C-clamp if necessary.
- For the passenger side bushing, lubricate any surfaces that touch the steering rack or bracket and fit it over the steering rack in the appropriate location.
Reinstalling the Steering Rack
- On the passenger side, position the bracket over the new bushing and hand tighten the 19mm nut and 19mm bolt to hold it in place.
- On the driver side, insert the 22mm long bolt from the front of the crossmember.
- Place the large washer supplied by Energy Suspension between the crossmember and steering rack, and pass the bolt through it, the driver side bushing, the previously removed washer, and into the 22mm nut

- Tighten the 22mm driver side nut/bolt and 19mm passenger side bracket until the steering rack is pulled closer to the crossmember and the center bushing is aligned with the mounting point on the crossmember.
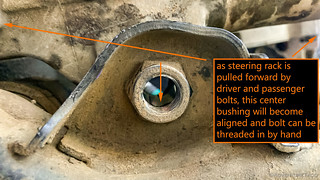
- Insert the 19mm center bolt through the bushing and hand tighten it. Note: if you can't hand tighten this bolt, then adjust the driver and passenger anchor points until the center bolt moves easily.
- Torque the 19mm passenger side bracket to 123 ft-lbs.
- Torque the 19mm center bolt to 123 ft-lbs.
- Torque the 22mm driver side nut to 141 ft-lbs.
- Using a 12mm socket, a wobble, and the necessary extensions, reinstall the bracket that secures the power steering lines to the frame. Torque to "tight."
Reconnecting the Outer Tie Rod (OTRE) to the Lower Ball Joint (LBJ)
- Insert the OTRE post into the LBJ and thread on the associated 19mm castle nut.
- Using a 19mm socket, torque the castle nut to 67 ft-lbs, plus any additional to allow for insertion of the cotter pin.
- Insert and secure a new cotter pin.
Reinstalling the Sway Bar, End Links and Wheels
It's always important to torque suspension components with the truck on the ground, so be sure to install the wheels prior to the final torqueing of the lug nuts and sway bar end links.
- Use a 12mm socket to install the two (2) bolts securing the sway bar brackets to the frame. Repeat for other side. Do not torque.
- Install the bushing and washer on the sway bar end link before using a 14mm socket to secure the nut on the top of the sway bar end link. Repeat for other side. Do not torque.
- Torque the 12mm bolts securing the sway bar brackets to the frame to 19 ft-lbs.
- Reinstall the wheels and tighten, but do not torque, the lug nuts.
- Remove jack stands supporting front of vehicle.
- With truck supporting its own weight, torque lug nuts to 89 ft-lbs.
- Torque the 14mm nuts on the sway bar end links to 14 ft-lbs.
With everything taken care of, take the truck in for an alignment!
Great write up!
Did you have to disconnect the rack from the steering shaft/slip joint? It seems to be hanging me up a bit
Thanks Ben! You don't need to disconnect the rack from the shaft/slip joint in order to replace the bushings, but it is pretty tight up there to do the work without doing that. The key - to enable the slip joint to stay connected - is to remove the bracket that secures the power steering lines to the frame. This will allow more/easier movement of the steering rack for bushing replacement. You can see that in the guide here. Once you remove that bracket, you'll get about 2-3" of extra play in the rack, allowing you to slide it off of the mounts and toward the rear of the truck. Make sure to have a floor jack there for it to rest on, so all the weight isn't on the power steering lines. ?
Thanks a ton for the write up! It was extremely helpful. The only thing I did differently was how I removed the power steering line bracket. I removed the splash guard on the driver side wheel well and with a 1/4 in ratchet and a short 12mm I was able to reach over the frame. Once there I blindly felt for the bolt and loosened it quite easily. It seems to have eliminated the need for all the extensions and a wobble! Thanks again for such a detailed write up!
Thanks Jonah - that's a great idea! I'll update the guide with that alternative. ?
are these parts sold by amazon the GENUINE energy suspension brand and not some cheap Knock-Offs that i have heard occur with some parts
Thanks!
J A Y
Hey Jay, I purchased the ES bushings from amazon and I did get genuine bushings. I know that because it turned out that I wasn't sure I got the right thing in my box, and so actually talked to ES about them, and in the process, sent them some photos. They also sent me photos, and verified that I got the righ (and thus real) thing! Hope that helps! You can of course always source the parts wherever you feel most comfortable. ?
Ok, thank you for the information!
I’m about to do a full suspension upgrade and figured I’d steering rack same time since it’ll all be down anyway. I bought that 10101R as it was suggested from 4WP. Truck is a 2000. I don’t have that extra sleeve like you said. Will I need the different sleeve?
Hey Garrett, the only way you'll know if you need the extra sleeve is to remove that center bolt (that goes through the sleeve) and see if it fits inside the sleeve. If it does, you're good to go; if it doesn't, you need the sleeve (which will have thinner walls so the bolt fits). On my 2000, I didn't need the thinner sleeve. Hope that helps!
Hey there. First of all, very helpful write-up. I’ve used a bunch of your “how-to’s” recently on my 2003 Tacoma, and I always check your list first before I venture out to YouTube or other sources.
This weekend I replaced my steering rack bushings, inner and outer tie rod ends, and SPC upper ball joints (with new non-greasable sealed joints from SPC). Something to note… I used both of the supplied sleeves that came with the energy suspension bushing kit, and they fit snug without any issues. I don’t think that my 2003 Tacoma has the larger diameter bolt that you’re referring to, unless energy suspension has compensated for this in the kit I purchased.
I have a question regarding your step about locking the steering wheel in place since that is the one thing I forgot to do. I was wondering why this step is necessary since technically any rotation of the steering shaft would just translate to in/out movement of the tie rod ends, since it would be “relative” to the rack itself. My theory is that as long as the rack is placed back in the exact same location, then the steering wheel position should not be affected. Any rotation of the steering wheel would just translate to the front wheels turning slightly once the tie rod ends are re-attached to the knuckle. (I think)
The reason I ask is because I ended up replacing my tie rod ends with Moog since that is what was available at the parts store nearby and the quality seems to be pretty good, however the length of thread differs from OEM, and the outer joint is greasable (hopefully they don’t collect too much junk too quickly). My steering wheel is slightly off axis and my toe is definitely “bad” thanks to my not so scientific measurements. I’m wondering if my steering wheel is off axis because of the tie rod end lengths or if I messed something up with the steering alignment while doing the rack bushings and forgetting to lock the wheel. I’m going to attempt a basic front end alignment tonight and will report back.
I appreciate any insight you may have! Thanks again for the awesome content.
-Adrian
Hey Adrian, glad you've found the guides helpful! I'm always happy to find others who have done work that I can learn from, so it's nice to be able to give back a bit when I can. When it comes to the steering wheel - you're correct that it is relative to the positioning of the tie rod ends, and to some degree you can correct for any misalignment by adjusting the OTREs. The "problem" is that relative to the distance that they move when you turn the wheel, you don't have a lot of adjustment via the threads. That said, I'd certainly try to get an alignment and see if you can get it take care of with the tie rods prior to pulling apart the rag joint again.
Do report back on how it goes, I'm curious! ?