")
Over time, rubber bushings wear out and need to be replaced. This happened for me recently when I Replaced All the Bushings on my Tacoma, and I figured that others could benefit from a quick little guide that shows the entire process and lists all the necessary parts.
Before getting started, I should note that when replacing the Lower Control Arm (LCA) bushings, one must remove the steering rack from its mounts. As such, this is also a good time to refresh the bushings that secure it as well, which is not a difficult process: Step-by-Step Steering Rack Bushing Replacement on a 1st Gen Tacoma (or 3rd Gen 4Runner).
When replacing the LCA bushings, there are a few ways to go about it. The first decision to make is whether you want to go with new rubber bushings or polyurethane bushings. Having run both types, there are pros and cons of each:
Rubber bushings - these give a softer/better ride than polyurethane especially on pavement, but are harder to install (if replacing just the bushing). They also don't hold an alignment as well/long as a polyurethane bushing, and may wear more quickly (depending on care, terrain, etc.) There is no maintenance between replacements, but since the rubber bushings are sleeved, they must be pressed in/out of the control arms, so replacement itself is more difficult. There are several options with rubber bushings:
- Completely new LCAs. This is how Toyota wants you to do it, since you don't need any special tools to press out the old bushings. But dang, OEM Toyota LCAs are expensive (L: 48069-35120 | R: 48068-35120), if all you need are bushings. Of course, you can always get aftermarket LCAs, which people seem to have reasonably good luck with and are much less expensive (Moog L: Left | R: Right) (Mevotech L: Left | R: Right).
- OEM Toyota LCA Bushings. Toyota does sell replacement bushings, but since they really want you to replace the entire LCA instead, they are not cheap - usually costing close to $350 for a full set of four.
- Whiteline LCA bushings. Lots of folks go this route, and the Whitelines install very similarly to the OEM bushings - rubber inside of a metal sleeve that presses into the LCA.
Polyurethane bushings - these are generally considered a "high-performance" option because polyurethane is a more solid material than rubber. In practice, this means that they reduce the amount of "give" or "slop" in the system, which can result in a more "responsive" feel. This responsiveness also makes for a rougher ride as the harder material transfers road vibrations through the rest of the vehicle. Swapping polyurethane bushings is easier, but they require more maintenance (greasing) between replacement.
- Strongflex Polyurethane LCA bushings. These have the benefits and drawbacks noted above. The real reason to choose this route is because the poly bushings insert directly into the LCAs, with no pressing in of a metal sleeve. This should - in theory anyway - make future replacement a piece of cake (at the cost of a "smoother" ride).
In general, I recommend going with rubber Whiteline LCA bushings for several reasons:
- While it may seem like small rubber bushings can't make that much difference in ride quality, I was surprised to find how much harsher the ride was with polyurethane LCA bushings. Most of us - with the possible exception of long-travel-desert-prerunner-race-style setups - spend so much more of our time in "normal" driving conditions that having a nicer ride should be prioritized.
- Unless you already have sleeveless polyurethane bushings installed, you need a press to get the old rubber bushings out, so the drawback of pressing in new rubber bushings isn't that big a deal.
- Polyurethane bushings will squeak unless greased regularly. Greasing every oil change is also necessary to keep the bushings from prematurely wearing out.
All of these options are covered in this step-by-step guide (where I happened to be installing polyurethane bushings), and I call out below which steps can be skipped if you're going one route or another.
Parts
Parts for this job are pretty straight forward. Obviously, you need bushings, but it's also highly recommended to get new cam sleeve, nuts, and bolts since it is common that the existing ones will be rusted into the bushings and need to be cut out.
- Bushings. One of the following, which I recommend in this order, though any will work:
-
- Whiteline LCA bushings. Great choice. Often easier to purchase and less expensive than Strongflex. Best choice for most people.
- Strongflex Polyurethane LCA bushings. Race-truck performance, easiest installation, harshest ride.
- New LCAs - OEM: (L: 48069-35120 | R: 48068-35120) or aftermarket: (Left | Right). A good option if you don't have the tools to press out the old bushings.
-
- 4 of Toyota OEM Alignment Cam Sleeve (48409-35050)
- 4 of Toyota OEM Alignment Cam Nut (48452-35020)
- 4 of Toyota OEM Alignment Cam Bolt (90080-11283)

Tools
While this job isn't difficult with the right tools, there are several "specialty" tools necessary in order to get the job done easily. These tools are generally useful for working on the front end of a Tacoma, so don't worry that you'll need them for this job only; you'll use them over and over again.
- 20 ton press from Harbor Freight - used for pressing out the old LCA bushings.
- Press/Pull Sleeve Kit - used to capture the LCA (and other) bushings as they are pressed out.
- OTC 6295 Front End Service Kit - contains pitman arm puller, used to separate the LCA from the lower ball joint (LBJ).
- OTC 4518 Stinger 5-ton Bar-Type Puller/Bearing Separator Set - used when pressing out the old bushings.
- Floor jack.
- (2) 6 ton jack stands.
- (2) 3 ton jack stands.
- Misc sockets (I recommend this set from Williams, a Snap-On brand)
- 12mm socket - steering rack, sway bar removal.
- 14mm socket - sway bar end link removal.
- 19mm socket - lower shock mount, steering rack.
- 21mm socket - to remove lug nuts.
- 22mm socket - to remove steering rack, OTRE castle nut.
- 24mm socket - LBJ castle nut removal.
- Ratchet, Extensions, as necessary.
- Breaker Bar.
- Torque Wrench.
- Cold Chisel and Hammer.
- A Propane (good) or MAPP gas (better) torch - to apply heat when pressing out bushings.
- A reciprocating saw and carbide tipped blades - if necessary to cut out the alignment cam components.
- An impact wrench for lug nuts and various other tasks.

Doing the Job
Most of these steps are relatively straight forward, and sometimes the order can be swapped around a bit based on your own preferences.
Accessing the Lower Control Arms
The first thing to do is gain access to the LCAs, which need to be removed. Since these are common tasks, I'll outline them without going into too much detail.
- Using a floor jack and jack stands, support the front of the truck on the frame with both front wheels completely off the ground.
- Remove the wheels.
- Lock the steering wheel. This is necessary in order to maintain correct steering wheel orientation once the steering rack is removed in order to access the LCA bolts.
- Make sure the parking brake is on, and at least one rear tire is chalked.
- Remove the skid plates.
- Remove the sway bar and sway bar end links if they are installed.

Disconnecting Outer Tie Rod (OTRE) from the Lower Ball Joint (LBJ)
In order to more easily move the steering rack out of the way of the LCA cam adjusting bolts and sleeves, it's necessary to disconnect the rack from the LBJ.
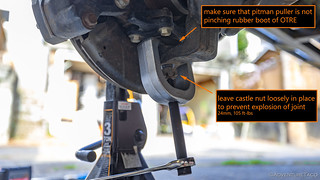
- Remove the cotter pin from the OTRE castle nut.
- Use a 22mm socket to loosen the castle nut securing the OTRE to the LBJ.
- Use the smaller Pittman Puller in the OTC 6295 Front End Service Set to separate the OTRE and LBJ. Note: leave the castle nut loosely threaded onto the OTRE when you do this, and it will keep the joint from exploding when it's pressed out.

Removing the Steering Rack
Removal of the bolts securing the steering rack is necessary in order to move the steering rack a bit, allowing access to the LCA cam adjusting bolts and sleeves.
This process is covered here: Step-by-Step Steering Rack Bushing Replacement on a 1st Gen Tacoma (or 3rd Gen 4Runner).

Disconnecting Suspension and LBJ from the LCA
- Using a 19mm socket and 19mm wrench, remove the nut from the lower shock mount.
- With the nut removed, pull the lower shock bolt out of the mount. Note: you may need to relieve tension on the bolt slightly to do this by lifting the hub/rotor assembly.

- Support the spindle and upper control arm using a jack stand under the rotor. This will keep unnecessary pressure off of the suspension components as well as the CV axle.

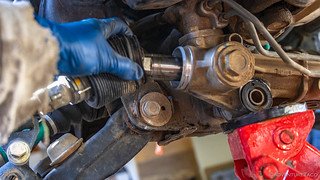
- Remove the cotter pin from the LBJ castle nut.
- Using a 24mm socket, loosen, but do not completely remove, the LBJ castle nut.
- Use the larger Pittman Puller in the OTC 6295 Front End Service Set to separate the LBJ from the LCA. Note: leave the castle nut loosely threaded onto the LBJ when you do this, and it will keep the joint from exploding when it's pressed out.
Removing the LCA Cam Adjusting Bolts, Nuts, and Sleeves
This part of the project can be difficult if your cam bolts, nuts, and sleeves are rusted into place, or rusted to the sleeves of the LCA bushings. Before continuing forward, make sure you have replacement parts on hand for any that might be destroyed in this process, or simply plan to replace them as good practice.
- To remove the passenger side front and rear, and driver side front bolts, use a 19mm wrench to hold the Alignment Cam Nut and a 22mm socket to loosen and remove the Alignment Cam Bolt.
- To make room to remove the driver side rear bolt, remove the band clamp securing the steering rack boot that covers the Inner Tie Rod (ITRE), and slide the boot toward the OTRE.
- To remove the driver side rear bolt, use a 19mm wrench to hold the Alignment Cam Nut and a 22mm socket + extension to loosen and remove the Alignment Cam Bolt.
Note 1: to fit the 22mm socket + extension, as well as remove the bolt, you will need to manipulate the steering rack out of the way.
Note 2: Protect the ITRE shaft using a rag between the extension and ITRE.
- As each bolt is removed, pry the Alignment Cam Nut off the opposite side of the joint. Note: the Alignment Cam Nut may be rusted onto the Alignment Cam Sleeve. If this is the case, the sleeves may need to be cut out; see Cutting out the LCA Cam Adjusting Sleeves below.
- With the Alignment Cam Nuts removed, pry the Alignment Cam Sleeves out of the LCA bushings. Note: the Alignment Cam Sleeves may be rusted into the LCA bushings. If this is the case, the sleeves may need to be cut out; see Cutting out the LCA Cam Adjusting Sleeves below.

- Once all of the Cam Adjusting Sleeves are removed, continue to Removing the LCAs.
Cutting out the LCA Cam Adjusting Sleeves (only if necessary)
If the Alignment Cam Nuts or Sleeves are rusted in place, they will need to be cut out. Carbide tipped blades are necessary for this as the steel in the LCA bushing sleeves is hardened and normal blades will dull quickly.
- Using a reciprocating saw with carbide tipped blades, cut through the Cam Adjusting Sleeves, being careful not to mar the LCA surface or frame mounting surface.
Note 1: A large cut-off wheel can be used for this as well, but a saw is recommended.
Note 2: After cutting one side of the LCA out, place a Alignment Cam Bolt through the bushing to hold it in place more easily while cutting the second leg.


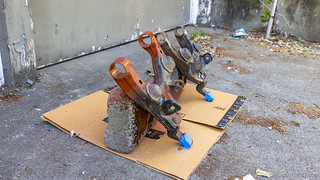
Removing the LCAs
With the Cam Adjusting Sleeves removed, the LCA is free and can be removed from the frame.

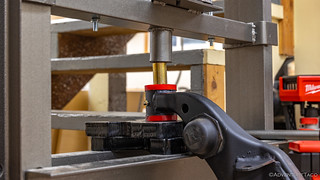
Pressing Out the Old LCA Bushings
Pressing out the LCA bushings entails application of both force and heat. Heat is supplied by a torch, and force can be applied with either a 20-ton press (recommended) or a bottle jack.
Using a Press (recommended)
When using a press, a bearing splitter is used to push the LCA down over a socket on the press surface. As the LCA is pressed down, this socket keeps the bushing from moving, effectively pushing it out of the LCA and into a sleeve placed on top of the bearing splitter.
- Using a hammer and cold chisel, bend the flange of the bushing away from the LCA so that the bearing splitter fits between the two surfaces.

- Attach the bearing splitter between the LCA and bushing flange. Ensure that the edge of the bearing splitter supports the perimeter of the LCA as much as possible, as you will be pressing on the bearing splitter to force the LCA down.

- Place a 24mm socket on the press surface, followed by the LCA, followed by a 76mm outside-diameter press sleeve and cap. Note: For one side of the LCA, a deep 24mm socket can be used. For the other side of the LCA, a shorter socket must be used in order to clear the LCA on the press.
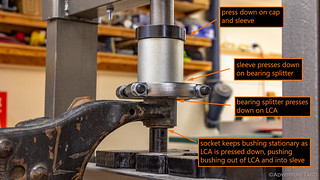
- Using a torch, apply heat around the entire bushing area in order to expand the LCA slightly and to help break any corrosion between the LCA and bushing sleeve.

- Slowly use the press to press the LCA down while the 24mm socket forces the LCA bushing to remain stationary, pressing it out of the LCA.
Using a Bottle Jack (commonly done; not recommended)
When using a bottle jack, the most important thing to ensure is that you don't apply so much force between the LCA legs that you deform the LCA itself as you press out the old bushings.
- Place the OEM bottle jack between the LCA legs with the top against the LCA bushing that you want to remove.
- Secure a ratchet strap as best you can around the LCA legs to assist in keeping them from spreading as the LCA bushing is pressed out.
- Using a torch, apply heat around the entire bushing area in order to expand the LCA slightly and to help break any corrosion between the LCA and bushing sleeve.
- Slowly use the bottle jack to press the LCA bushing out of the LCA.

Prepping for and Installing New Bushings
With the old bushings removed, the difficult part of the job is complete. Reassembly is much easier as long as the LCA legs have not been spread during removal.

- Clean out the LCA sleeves using steel wool or Emory cloth.
- Apply a coat of primer and paint to the LCAs, in any locations that you heated, to protect from future rust.
If you are installing Strongflex bushings:
-
- Apply grease to the outer surface of the bushings and insert two bushing halves into each LCA sleeve. Note: If you have both red and yellow bushings, the red bushings go in the front hole and the yellow bushings go in the rear hole.

- Apply grease to the inner surface of the bushings and to the outer surface of the metal inner sleeve.
- Slide the metal inner sleeve into the bushing.
- Apply grease to the outer surface of the bushings and insert two bushing halves into each LCA sleeve. Note: If you have both red and yellow bushings, the red bushings go in the front hole and the yellow bushings go in the rear hole.

If you are installing Whiteline bushings:
- Apply grease on the interior surface of the bushings and the outer surface of the inner sleeves.
- Press the inner metal sleeves into the bushings.
- Apply anti-seize to the inner surface of the LCA and outer metal surface of the bushing.
- Press the bushings into the LCA using a vice or press.
Note 1: If using a vice, a pair of Channellock pliers can be used between the vice jaw and metal bushing lip to avoid pressing directly on the rubber.
Note 2: if using a press, a 50mm inside diameter/60mm outside diameter sleeve can be used to press on the metal bushing lip.
Reinstalling the LCA Cam Adjustment Hardware
Installation is essentially the opposite of removal. Repeat this process twice for each LCA.
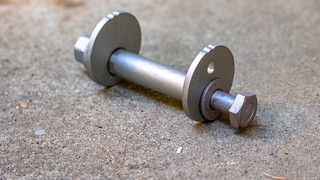
- Spread some antiseize on the outer surface of the LCA Cam Sleeve.
- Insert the LCA Cam Sleeve to secure the LCA.
- For Strongflex, the LCA Cam Sleeve passes through the frame, through the LCA bushing, and through the opposite side of the frame. Note: There are no washers used between the bushings and frame with this product.

- For Whiteline, the LCA Cam Sleeve passes through the frame, through a washer, through the LCA bushing, through a second washer, and finally through the opposite side of the frame.
Note 1: the LCA Cam Sleeve inserts from the front of the vehicle for the front leg of the LCA, and from the rear of the vehicle for the rear leg of the LCA.
Note 2: When inserting the driver rear LCA Cam Sleeve, you will need to start the sleeve into the LCA leg with the offset adjuster pointed down in order to slide by the steering rack. Once it is past the rack, you can rotate it into the appropriate position.
Note 3: Before moving to the next step, ensure that the Offset Cam Adjusters on the Sleeves and Nuts are oriented "up," with the bolt hole on the bottom.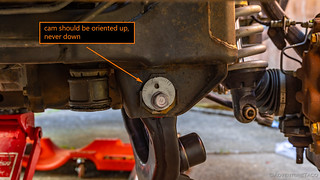
- For Strongflex, the LCA Cam Sleeve passes through the frame, through the LCA bushing, and through the opposite side of the frame. Note: There are no washers used between the bushings and frame with this product.
- Align the LCA Cam Nuts so that the offset adjusters are aligned in the same orientation as the adjuster on the sleeve and press it onto the sleeve.
- Spread some antiseize on the LCA Cam Bolts and slide it into the LCA Cam Sleeves. Only finger tighten the bolts at this point.
Reinstalling the Steering Rack
Whether you decided to replace your steering rack bushings or not, reinstallation of the steering rack is the opposite of removal. Torque specs are as follows:
- Driver side bolt: 141 ft-lbs
- Center bolt: 123 ft-lbs
- Passenger bolts: 123 ft-lbs
This process is covered here: Step-by-Step Steering Rack Bushing Replacement on a 1st Gen Tacoma (or 3rd Gen 4Runner).

Reconnecting the LBJ, and Lower Shock Mount, and OTRE
Installation is the opposite of removal.
- Insert the LBJ post into the LCA and thread on the associated 24mm castle nut.
- Using a 24mm socket, torque the castle nut to 105 ft-lbs, plus any additional to allow for insertion of the cotter pin.
- Insert and secure a new cotter pin.
- Insert the lower shock mount bolt from the rear of the vehicle, and thread on the associated 19mm nut to the front of the mount.
- Using a 19mm socket and 19mm wrench, torque the lower shock mount to 101 ft-lbs.
- Insert the OTRE post into the LBJ and thread on the associated 19mm castle nut.
- Using a 19mm socket, torque the castle nut to 67 ft-lbs, plus any additional to allow for insertion of the cotter pin.
- Insert and secure a new cotter pin.

Wrapping up the Installation
There are only a few things left to do in order to finalize the installation.
- Reinstall the sway bar (if desired) and torque to spec.
- End links at LCA: 51 ft-lbs.
- End links at Sway Bar: 22 ft-lbs.
- Sway Bar frame mounts: 19 ft-lbs.
- Reinstall the skid plates.
- Reinstall the wheels and tighten, but do not torque, the lug nuts.
- Remove jack stands supporting front of vehicle.
- With truck supporting its own weight, torque lug nuts to 89 ft-lbs.
Alignment
It's important to take the truck in for an alignment immediately, as your alignment will be significantly off after performing this work. However, even prior to getting an alignment, it's important to eyeball the alignment and get it "close," so you aren't chewing up your tires on the way to the alignment shop.
- Park the truck on a flat surface.
- Roll forward and backward approximately 20 feet.
- From the front of the truck, inspect the alignment to ensure the wheels are as vertical as possible. If they are not vertical, rotate the LCA Alignment Cams to adjust their orientation.

- Once you are satisfied that the wheels are mostly perpendicular to the ground, torque the Cam Adjusting Bolts to 96 ft-lbs.
Note 3: Ensure that the Offset Cam Adjusters on the Sleeves and Nuts are oriented "up," with the bolt hole on the bottom. - Take the truck in for an alignment.
Hi Dan,
I posted this in the Tacoma World forum but haven't gotten any response and would appreciate your 2 cents on it to help me with what direction to take on the bushings and ball joints.
I'm thinking of replacing upper and lower bushings as I'm installing the OME suspension kit. I got the Energy Suspension bushings but have not decided if I'm going to use them or not. Was seeing what others are saying here first. You said, part of the reason you went the route you did instead of Energy Suspension was that if you ever needed to replace them in the future, it should just be a slip out/slip in with the new ones.
If I install the Energy Suspension wouldn't in the future if I wanted to replace them it would be the same slip out/slip in also?
I like the idea with adding the grease zerks. Could I do that with the Energy Suspension bushings? I'm guessing yes but wanted to double check. Would need to drill through the LCA and metal bushing part I left in the LCA.
Has anyone added grease zerks to the UCA as well? I'm concerned about the squeaking of the poly bushings.
I looked at Strongflex bushings but didn't find them for my 03 tacoma 2WD prerunner. Do you know if they make the bushings for the UCA also?
You spoke about keeping the offset cam adjusters on the sleeves and nuts being oriented up, with the bolt hole on the bottom. Could I just mark the spot that the old ones were at and put them back to the same setting to be somewhat close or is the new bushings going to throw it way off anyway that it doesn't matter.
For longevity purposes, which bushings will last the longest? I don't do off road stuff, dirt sometimes.
Also, I'm going to replace the upper and lower ball joints. I'm trying to decide to use the OEM or Sankei 555. I've read that the Sanka 555 are equal to the OEM but can't confirm that for sure. Do you have any insights? Is there a better quality option that you know about? It seems the LBJ are a weak point in these tacomas so I want to do what I can to address that.
Thank you, Dwight
Hey Dwight, hope this helps:
Ease of second install: Unfortunately, the ES bushings push into the existing OEM metal sleeves, and if you ever want to replace them, you have to burn them out of the sleeves (or remove the sleeves) just like you do the first time. It’s definitely doable, it’s just a bit of a pain.
Grease Zerks: Yes, you can do it with the ES as well, but you drill through the metal sleeve *and* the bushing - all the way to the inner metal sleeve. Then, you can squeeze some grease in there if things start to squeak.
UCA Zerks: I’m not sure if folks have done it for the uppers, but it’s exactly the same. @Squeaky Penguin may have done it. He has definitely done it on the lowers.
Prerunner LCA and UCA Bushings: for the LCAs, you would use the same ones I used - the LCAs on a 4wd or 2wd Prernner are the same. I’ve not seen any for the UCAs as usually people put in aftermarket UCAs if they want poly bushings, and aftermarket LCAs all come with poly bushings.
Alignment: New bushings are going to throw everything way off. After installing them, you need to get an alignment immediately. Not a week later, immediately. Try to drive fewer than 20 miles after doing the job, IMO.
What lasts longest?: Rubber bushings last the longest *by far.* Like 5 times as long. If you don’t know why you need polyurethane, stick with rubber IMO. In fact, in that case, I’d look at the option of just purchasing aftermarket LCAs and using those. (Moog L: Left | R: Right) (Mevotech L: Left | R: Right). They will come with rubber bushings already installed. I might go back to rubber next time for that exact reason.
LBJs: I’d go with OEM. There just seem to be fewer problems with the OEM ones, and as you mention, that’s a place known to be a weak point. 555 is the “second best” from what I’ve heard, but why skimp on the weak point?
Hope that helps!
While I got your ear on the subject.
Going to replace the cam bolts and cam adjuster. Would you use OEM or is there a better aftermarket available?
Would you also replace the long upper control arm bolt with the UCA bushings?
Thanks you very much,
Dwight
I would use OEM on the parts for the lower cams. These are the parts you need:
There’s no need to replace the long upper bolts unless you find that they are extremely rusty. I’ve never seen any that are rusty (even when the lowers are seized), but I do live on the west coast... so... 🤷♂️
To be fair it is good practice to mark on the alignment cam (especially if you are reusing) and frame so that you can put them back in at the location they were taken out. Unless your previous alignment was done with bushings that are completely falling apart this is going to put the alignment back into the "ballpark" of where you need it and should be sufficient to get you to the alignment shop in order to have a proper alignment done.
Anytime someone messes with those cams the alignment needs to be checked and or adjusted and when you replace things like that it absolutely requires alignment of the vehicle. It is just a practice that generally gets you back close enough to get your vehicle to the alignment shop
My 2001 taco has zero problems right now with original rubber bushings. I dont hear any noise or anything. Truck has 184K and drives as well as the day I bought it in 2005 when it had 63K. What is the reason to go with Polyurathane? Great write up for when I cross this bridge.
If you haven't had any issues, then I certainly wouldn't worry about anything - though, at 184K miles, and 20 years old, it might be getting to be time ?. For me, the poly bushings had two main advantages.
And I guess there was a third advantage as well - you can't buy OEM replacement bushings without purchasing entirely new Lower Control Arms (LCAs), and those are super expensive.
Hope that helps!
Ok got that from your previous post that the rubber ones last way longer by about 5x! But in the above post you say they dont.
Anyway, they dont sell aftermarket rubber ones that can be pressed in? Im just thinking that the proof is in the pudding that the rubber ones are proven to at least last as long as the ones that are installed on my truck so Im a bit confused. Not trying to pick on ya since Im not an expert , just a guy reading this article and obsessing over my taco!
Yeah, sorry - the length of time things last is so reliant on different factors, that it's easy to get confused and/or (like me) give different answers at different times.
Under "normal" conditions (primarily pavement driving, occasional gravel roads, that kind of thing), the rubber will probably last longer because it's not really being pushed hard. However, when you're driving the truck mostly on dirt, lots of washboard and rocky roads, etc., the rubber gets squished and pulled a lot more than the (firmer) poly. As such, it wears faster under those conditions (theoretically).
I caveat even that last point because I've never run poly prior to installing this set, so I can't say for sure, rather I'm sort of parroting what I've been told.
Honestly, my recommendation would be what I mentioned above: If you don’t know why you need polyurethane, stick with rubber IMO. In fact, in that case, I’d look at the option of just purchasing aftermarket LCAs and using those. (Moog L: Left | R: Right) (Mevotech L: Left | R: Right). They will come with rubber bushings already installed.
Yea I totally get it, id rather keep my toyota control arms but I guess thats not what folks are doing because its too hard to press the bushings in and out? Trying to keep things toyota by just replacing the rubber bushings if possible. Id rather not be the only one doing that! Probably indicates thats too difficult if its not a common thing to do i guess.
I recently followed your steps to replace my LCA bushings with Whiteline. Everything went well, and I was able to reuse all the factory hardware. In NM things don't seem to rust. I also replaced my LBJs and steering rack bushings, and got an alignment right away.
My 2003 Prerunner drives so much better, but the ride seems to have gotten quite a bit harsher. Is that mostly due to the Whiteline bushings, or could that be due to something else in your opinion?
Hi Gary, the harsher ride is most certainly due to the Whiteline bushings. Whenever polyurethane bushings are used to replace rubber, you're going to feel a lot more of the road, because the rubber does a lot to absorb the bumps. It's one of the main reasons that manufacturers use it, in fact. For some, the harsher/stiffer ride is actually desired - makes them feel like they are "more in touch" with the terrain; basically, the "drives so much better" bit that you've noticed. For others, it's just... harsh. Personally, I can see both sides - I prefer the feel of rubber; on the other hand, I don't know of any rubber replacement bushings for the LCAs, with the exception of replacing the entire LCAs themselves.
Hope that helps!
Thanks for the response. I almost wish I had found your article prior to my LCA bushing replacement job. The Whiteline bushings were $94 for the set of 4, and considering the MOOG set of arms with rubber bushings is $229, I probably would have gone that route if I'd known the WL bushings would feel as stiff as they do. I don't use my Prerunner for much except running around town and hauling stuff occasionally, so it's not as big a deal as it might be. I only notice the more harsh ride at slower speeds...oh well. My wife says "it's a truck - isn't the ride supposed to be like this?" 🙂
If it didn't mean another alignment afterward, I might consider redoing it with the MOOG LCAs.
Thanks for your input.
Question: The link for the StrongFlex bushing is not working for whatever reason. I am on StrongFlex website and started digging their to find the correct parts. The Yellow bushings (211427A) where easy to find due to the fact that the picture that you posted has the part number. The red bushings arent as easy to find. Any chance that you could provide the part number for those bushings if you have it please, Thank you!
Hi Michael - I purchased the StrongFlex busings from SonoranSteel (the web site that the link goes to) and it does seem that they don't have them listed anymore on the site. When I was buying them, I did a bit of digging myself - in the same way you are - on the StrongFlex site (which, I believe is over in the UK) and ran into the same issue you are - where I couldn't quite tell how to order directly from StrongFlex. The kit I got - with the red+yellow might be something that SonoranSteel put together themselves based on experience, or it might just be something StrongFlex doesn't list on their website for one reason or another. My recommendation would be to call SonoranSteel and/or StrongFlex to talk to someone and see if you can replicate the kit. If you do, I'd love to hear what you discover, so we can get updated info on this page for everyone. Cheers and good luck!
Got it. I just called Sonoran Steel and talked with Steve. The website though they where out of stock when in fact they are not. It is back up on their website now.
Note: StrongFlex only makes the red bushings in that size for him
- the red is softer than the yellow and helps with ride quality
Awesome, glad you were able to get that cleared up (for everyone!) And, nice that the call got them re-listed on the web site. THANK YOU!
I'm about to install the Strong flex poly bushings in my LCAs. Mind giving a SUPER brief tutorial for a first timer.
Hey Alex, do you have questions after reading through this post? It's pretty concise if you're doing the job for the first time...
Reccommendations for grease zerks. You threaded them into the holes using a tap and die?
I'd recommend using 90° grease zerks, just to make it easier to get the grease gun on them. I used M8 zerks, but you can use whatever size you have on hand or can get easily. Drilling a hole in the correct location, and then using a tap is exactly what I did to install them on my LCAs.
Cheers!
Did you have to modify the bushings at all to accept the grease from the zerks? I noticed you have sharpie marks in line with the zerks.
It will depend on your zerks. The threads on mine were just slightly longer than the thickness of the LCA, so they protruded about 1/16" - 1/8" into the sleeve where the bushings would sit. Because of that, I used a utility knife to trim a little scallop out of the bushings, but I don't know if it was really necessary. I used zerk fittings that were M8 threads, and my guess is that if I'd used M6 threads, they'd have been slightly shorter and I wouldn't have had to trim the bushings at all. For reference, all the other zerks on the Tacoma are M6 threads, but I'd picked up the M8s by mistake.
I didn't have great luck with the Strongflex bushings on my '01 4Runner. My last set of polys from either Energy or Whiteline lasted about 7 years. This set from Strongflex failed on my first trip. Not sure what happened but the bushing in my passenger front lower A arm chunked out and nearly half of the bushing is missing. Not sure why it failed but figured that I'd post up in case my experience isn't a fluke.
Thanks for the input Glen! I'll definitely be keeping an eye out for anything that looks amiss on mine. So far, they've held up well, but I still don't know if I wouldn't just replace the LCAs in the future. Seems relatively easy to do, and not all that expensive.
You never got back to me with more details and photos from dis-assembly. You are also the only person so far to report this. Did you add any washers or modify the parts? Do you have some dis-assembled photos to send me? I offered to send you a replacement bushing when you could find out the exact problem.
Thanks for weighing in here Steve - it's always nice to see that level of engagement from vendors. I've only heard (and experienced) good things myself with the bushings, and of course there's always the reality that having 100% of products be problem-free (especially in such varied uses as an offroad vehicle) is impossible.
Would love to hear if you and Glen are able to get this sorted.
Cheers, and thanks for the products that Sonoran makes available to all of us!
Trying to tighten my alignment cams after installing the strong flex bushings and as soon as I drive down the driveway the cams are moving tightened them all I could and still move. Any ideas?
Hey Cooper, not sure what you've got going on exactly. How tight (ft-lbs) are you able to get your alignment cams tightened (are they to spec @ 96 ft-lbs when the truck is under its own weight)? Are you using new alignment cam hardware, or are you trying to reuse whatever was on there? Is the hardware OEM (the coating often seems to be different to me) or something aftermarket?
I read your write up on the lower control arm bushings install. I will be using the Whiteline bushings but want to install zerk fittings like yours. As you know the Whitelines have a outer metal surface to the bushing that you press in like the OEM style. Because of that I'm thinking the zerk fitting will not work because in order for the grease to get to the inner metal sleeve I would need to drill a hole through the outer metal surface of the bushing and through the polyurethane bushing in line with the zerk fitting. And I'm not sure if the bushing would move with time inside the control arm past the hole drilled for the zerk fitting. Maybe I'm overthinking it and the zerk fittings are only used for the style bushings you used. Any insight would be appreciated. Thanks for your time.
Hey Dave,
You can definitely use a zerk with the Whitelines. The way you'll want to drill them is a bit different (for exactly the reasons you mentioned), but once you install the sleeved bushing, make sure you don't have the center metal sleeve inserted and drill a hole right through to the middle. Then, tap the portion of the hole in the LCA for the zerk and boom, you're good to go.
... If you wanted to get fancy you could cut some very shallow slots in the bushing material to better distribute the grease along the length of the bushing, but I wouldn't bother.
Hope that helps!
Dan
Hi Dan, what did you use to torque the LCA cams after eyeballing the alignment? There isn't enough room for my normal torque wrench.
My torque wrench won't fit directly either, but I was able to get a shallow socket onto the bolt head and then use an extension (maybe 8"? - long enough to get past the steering rack) to my torque wrench to get everything tightened up. As long as the extension is inline with the socket, it doesn't change the "torquiness" of a given setting.
Your other option (obviously) is to get it "just a bit tighter than a lug nut," which you might have a good sense of already, or can at least practice easily. Those are torqued to 89 ft-lbs, and the alignment cams are 96 ft-lbs.
Cheers,
Dan
Thanks! I'll mess around with that. Seems like the steering rack placement for my 04 Taco may be slightly different than your Taco. To get the passenger side cam in I had to have the steering rack unbolted and boot partially removed. Getting to the bolt head will be difficult but maybe do able. I need to drive it 10 miles round trip to a welder then another 8 for the alignment. Alignment is off visually so I should readjust my eyeball alignment before I do that though.
Thanks! I'll mess around with that. Seems like the steering rack placement for my 04 Taco may be slightly different than your Taco. To get the passenger side cam in I had to have the steering rack unbolted and boot partially removed. Getting to the bolt head will be difficult but maybe do able. I need to drive it 10 miles round trip to a welder then another 8 for the alignment. Alignment is off visually so I should readjust my eyeball alignment before I do that though.
You stated that you couldn’t get oem LCA bushings without buying the LCA. I just got some from Olathe Toyota on the web .$ 90 apiece !
Amazing Mike! Can you share the part number?
Bushing sub assembly 48061-35040
Thanks for that. I'd read your comment as 90 cents each, but I see that they are actually $90 each. At that point, it makes it more expensive than aftermarket LCAs, and definitely more expensive than going the poly bushing route. Always nice to have another option though, so I'm going to add this to the guide, thanks!
Hi,
Did those OEM bushings come in three pieces like the Whitelines?
My guess is that the OEM Toyota LCA Bushings (48061-35040) come as a single unit that gets pressed into the LCA, since they are rubber bushings and the rubber will be fused to the metal sleeve.
I just replaced the upper/lower control arms + ball joints on my 1999 4Runner and your write ups were very helpful, thank you. I opted for OEM LCAs/LBJs and JBAoffroad UCAs/UBJs.
One tip for anyone else removing their lower control arms -- I was able to avoid having to remove the steering rack boot by instead undoing the clamp on the power steering lines. The clamp is located on the frame rail, near the oil filter/alternator if you follow the power steering lines down from the pump. You can't see it without a mirror/camera, but you can feel the 10mm bolt. Undoing this clamp (in addition to the other bolts on the rack that you described) allowed me to slide the rack back just enough to use my impact on the lower control arm bolt and fully remove/replace it.
Do you guys generally wait until the truck is back on the ground to torque everything up. I mean the cam bolts, tie rod and ball joint nuts, shock bolt, etc?
Hey Weylin, suspension components should be torqued when on the ground. That means alignment cam bolts (LCA mounts), shock bolts, etc. should be torqued under load, but things like your tie rod ends, or the steering rack can be torqued when the truck is in the air. Hope that helps!
Hi, I’m cleaning up some OEM LCAs in preparation to swap them in with Strongflex bushings. Thank you for writing these very helpful instructions. I’m weighing whether or not to install zerks like you did. Couple of questions. It looks like you tapped the factory holes in the backs of the UCAs for this? Do you remember what the thread size of the zerks you used? If I decide not to add zerks do you recommend plugging the holes in the backs of the UCAs? Thanks, Harry
Hey Harry, I don't recall there being any factory holes on the backs of my LCAs; in any case, I did not use them. The zerks I used were some straight zerks, but they are hard to access without disconnecting the LBJ to fold the LCA down. As such, I'd recommend these 90° grease zerks, which you'll have easier access to without "disassembly." I wouldn't worry about filling any other/existing holes in the LCAs.