")
Background - If At First You Don't Succeed...
My A/C hasn't worked for the last couple of years and I'd finally gotten around to fixing it - or at least, so I thought! A local Toyota dealer theoretically diagnosed my issue as being a problem with my A/C Evap Core, and I set about fixing that in It's Too Damn Hot In Here - Fixing the A/C. Turns out, that didn't fix the problem - and so next on my list was replacing the only moving part in the system - the A/C compressor.
That's a story worth reading in itself, and if you're interested, check out If At First You Don't Succeed - Fixing the A/C, Again. But, if all you're interested in is how to replace your A/C compressor, then simply keep reading below...
Trouble with Your Air Conditioning?


")
Gathering Parts
Replacing the A/C compressor means you'll - obviously - need a new compressor. You have a couple good options in this space - OEM or Denso:
- Toyota OEM - you can go Toyota-OEM-sourced here, but you'll pay for it. I'd recommend against it. The OEM compressor does not come with a clutch, so you'll need to re-use your old one or buy a new one
- Denso A/C Compressor w/Clutch (471-1223) - Denso makes the Toyota OEM A/C compressor as well, so this one is identical except for the box. Plus, it comes with a new clutch! Save a few hundred dollars and be just as happy! This is the part I recommend.
- DEX/MERC ATF - 1qt - you'll need a bit of DEX automatic transmission fluid to refill the power steering pump after removing it, since some of the fluid in the reservoir will drain out.
You should also pick up a few other things at the same time. Any o-rings you run into should be replaced, and it's good practice to replace your Receiver/Drier any time you replace a major component of your A/C system. So, then, the following parts:
- A/C Receiver Drier (88471-34010)
- Santech MT2580 A/C System O-Ring and Gasket Kit - I figured that I might as well replace any o-rings that I came across during this process, and this Santech kit is made specifically for our Tacomas.
- A/C PAG46 Oil - 8oz - this oil is used to lubricate various parts of the system. Note that ND8 shown in some of my photos is equivalent to PAG46.
- 10ml (10cc) syringe - used to measure the right amount of PAG46 oil into the system.

Tools for the Job
You'll need the following tools and supplies regardless of whether you're charging the system yourself:
- A few sockets (this is a good set) - 10mm, 12mm, 14mm, 17mm.
- Two adjustable wrenches - 8-inch and 10-inch
- Philips and Flat screwdriver
- A 6mm hex key (this is a good set)
Note: You only need the following tools if you're going to charge the A/C system yourself. It's easy - and cheaper than the $150 or so to have a shop do it - so I recommend picking these up if you don't have them already:
- A/C Diagnostic Manifold Gauge Set - this gauge set would allow me to test the system and to charge the system with 134a refrigerant once I knew it would hold pressure.
- A/C Vacuum Pump - working in tandem with the manifold, the vacuum pump removes all air (and more importantly moisture) from the A/C system prior to charging.
- Pneumatic A/C Vacuum Pump - you can use this pump and save a few bucks if you have a big compressor around that can generate 4.2 CFM @ 90 PSI
- Standalone A/C Vacuum Pump - if you don't have a large compressor, this pump will work great by itself.
- 2, 12oz cans of 134a A/C refrigerant - this is the stuff that makes it chilly.
- A/C Can Tap for R134A Refrigerant - connects the cans of refrigerant to the manifold gauge.
Doing the Job
With all the parts in hand, let's get started - it's straight forward and has 5 major sections.
- Replacing the Receiver/Drier - covered in Replacing the A/C Receiver/Drier on a 1st gen Tacoma.
- Removing the Air Box and Power Steering Pump to gain access to the A/C compressor. Covered below.
- Removing and replacing the A/C compressor. Covered below.
- Putting everything back together. Covered below.
- Charging the A/C system - covered in Charging the A/C System on a 1st Gen Tacoma.
Replacing the Receiver/Drier
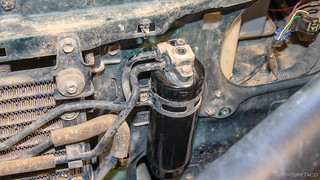
Since I knew I was going to be coming at the A/C system from both ends, I got started in the engine bay, replacing the A/C Receiver Drier. The work in this replacement is actually in accessing the Drier, since you have to remove the grill and headlight.
It's not hard however, and you can see exactly how to do it here:
Replacing the A/C Receiver/Drier on a 1st gen Tacoma
Once you've replaced the Receiver/Drier, don't put anything else back together yet, since you'll want to test the A/C system for leaks before you get all buttoned up. Instead, move on to removal of the A/C evaporator core.
Removing the Air Box and Power Steering Pump
With a 5VZFE (v6) engine, there's no room to get the A/C compressor out of the engine bay without removing the Power Steering Pump first. It takes some time to access the bolts, and can be a bit messy, but stick with it - getting it all back in is much easier.
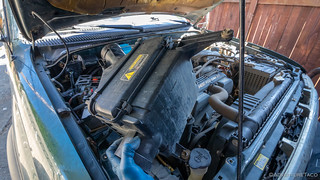
Start by removing the box housing the air filter.
- Remove the 3, 12mm bolts that secure it to the truck.
- Loosen the 10mm hose clamp that leads to the air intake tube, and disconnect the large tube.
- Loosen the compression clamp that holds the small vacuum tube to the box, and disconnect the small line.
- Unplug the MAF.
- Wiggle out the air box and set it aside.

With the air box removed, there's more room to work on the power steering ump. First remove the electrical connector (a), then the fluid lines (b), and finally the fasteners securing the pump (c).

- Unplug the electrical connector.

- Get a catch container ready and remove the spring clamp securing the small line, placing the catch container under the reservoir to catch as much fluid as possible.

- Cap the line with a bolt, secured with the spring clamp, in order to keep things clean, and to keep more fluid from leaking out.
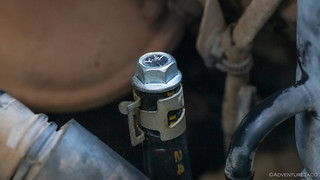
- Use a 17mm socket or wrench to loosen, and then remove, the banjo bolt that secures the lower line to the power steering pump.
- Note: Wrap the end of the line in a plastic bag in order to keep it clean through the rest of the process.
- Note 2: Make sure to have some rags under the opening, as more fluid will leak out. Additionally, be sure not to lose either of the crush washers.

- Remove the 14mm nut that secures the tensioning bolt at the bottom of the pump, then loosen, but do not remove the tensioning bolt so the pump can move.
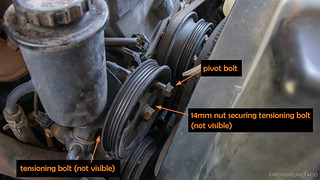
- Remove the power steering belt from the pulley.
- Remove the 14mm bolt that secures the top pivot point of the power steering pump to the engine.
- Lift out the power steering pump and set it aside.

At this point, spend a bit of time and clean up any spilled power steering fluid, so you aren't getting it everywhere through the rest of the process. Brake cleaner will work here, or just use shop rags to towel everything reasonably dry and clean.
Removing the A/C Compressor
With the power steering pump out of the way, removing the compressor is reasonably straight forward. Start by removing the A/C idler pulley - this is the lowest pulley at the front of the truck.
- Use a 12mm socket to loosen the nut through the center of the pulley.
- Use a 12mm socket or wrench to loosen the tension bolt until you can slide the idler pulley far enough to remove the belt from the pulley.

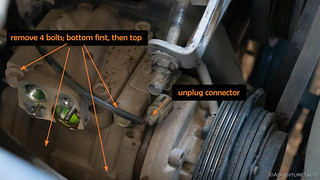
- With the belt removed from the A/C idler and A/C compressor, move on to the refrigerant lines. Loosen and remove the 10mm bolts that secure the lines to the compressor. Note: once you remove these lines, wrap the ends in plastic bags to keep them from getting contaminated with dirt through the rest of the process.

- Disconnect the power connector from the A/C compressor.
- Remove the 4, 12mm bolts that secure the A/C compressor to the engine, and lift the A/C compressor out the top of the engine compartment. Note: Remove the lower bolts first, so you can hold the compressor form above while you remove the two upper bolts.
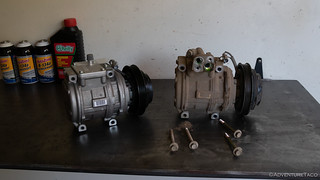
- Compare the old and new A/C compressors to ensure that they are identical.

Preparing the New A/C Compressor
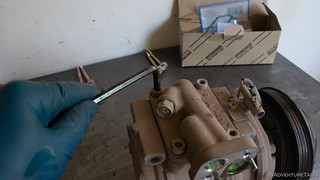
If you've purchased the Denso A/C Compressor w/Clutch (recommended), it will not come with the Tacoma-specific top plate, so you'll need to transfer the top plate from the original compressor to the new one. Additionally, the new compressor will come filled with PAG46 oil, and that oil needs to be drained so the correct amount of PAG46 can be added for the Tacoma system.
If you've purchased the Toyota OEM compressor and separate Clutch (or are re-using your old Clutch), you'll need to install the Clutch onto the new A/C compressor. This is done by removing the 10mm center bolt, using a puller to remove the clutch, and then securing the clutch to the new compressor.
- Use a 6mm hex key to remove the 4 bolts securing the top plate to the old compressor.
- Remove the temporary top plate from the new compressor, along with any gaskets between the A/C compressor and temporary top plate.
- Turn the new A/C compressor upside down over a drain pan and turn the clutch several times in both directions, until all of the oil drains out of the compressor. Note: you may not get every drop of oil out, but get enough that you can no longer hear it sloshing around inside the compressor when shaking the compressor.
- Using a syringe, measure 110cc of PAG46 oil and pour it into the new compressor.
- Note 1: The FSM calls for 125cc of PAG oil in the compressor. Because you can't get 100% of the oil out of the compressor when you drain it, and overfilling the oil can lead to poor cooling, I find that adding about 110cc to the compressor results in about 125cc in total.
- Note 2: this seems like a lot, but it will fit with no problem. Turn the clutch periodically in order to allow the oil to flow into all parts of the compressor.
- Replace the top plate gasket with one from the Santech MT2580 A/C System O-Ring and Gasket Kit, oiling it with PAG46 before setting it in place.

- Secure the original top plate to the new A/C compressor. Tighten the four 6mm hex bolts securely, but let the gasket do its job; do not over tighten.

At this point, the new A/C compressor is ready to be reinstalled into the Tacoma.
Installing the New A/C Compressor
Installation is largely the reverse of removal.
- Install the four, 12mm bolts that secure the A/C compressor to the engine. Torque to 18 ft-lbs. Note: Apply some antiseize to these bolts to make future removal easier.

- Reconnect the power connector.
- Replace the o-rings on the refrigerant lines with new o-rings that you've oiled using PAG46 oil.
- Install the refrigerant lines with 2, 10mm bolts. Torque to 7 ft-lbs.
- Reinstall the A/C idler pulley and start threading the 14mm nut that secures it. Do not tighten at this point.
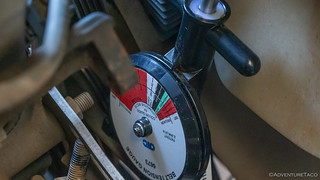
- Loop the A/C belt around the appropriate pullies. Use the 14mm tensioner bolt to tension the drive belt to 100 lbs.
- Tighten the 14mm idler pulley nut to 29 ft-lbs.
Installing the Power Steering Pump and Air Box
Installation is largely the reverse of removal.
- Place the power steering pump in position and insert the 14mm pivot bolt. Hand tighten only at this point.
- Start threading the 14mm tension lock nut into place.
- Loop the power steering belt around the appropriate pullies. Use the 14mm tensioner bolt to tension the drive belt to 100 lbs.
- Tighten the 14mm tension nut and 14mm pivot bolt to 32 ft-lbs each.
- Reconnect the power connector.
- Replace the small line and respective spring clamp.
- Replace the 17mm banjo bolt, ensuring that a crush washer is between the bolt and fitting, as well as between the fitting and power steering pump. Torque to 34 ft-lbs. Note: Make sure the stopper of the tube is touching the PS pump body
prior to torqueing the banjo bolt.
Next, reinstall the air box.
- Tighten the 3, 12mm bolts that secure the air box.
- Connect the large tube and tighten the 10mm hose clamp that leads to the air intake tube.
- Connect the small line and tighten the compression clamp that holds the small vacuum tube to the box.
- Reconnect the MAF.
Finally, bleed the Power Steering system and replace fluid that was lost when the power steering pump was removed.
- Jack the front two wheels off the ground.
- Fill the power steering reservoir to the "cold fill" line with DEX/MERC Automatic Transmission Fluid.
- Turn the wheels to full lock on both the left and right several times, checking the fluid level and keeping it filled to the "cold fill" line.
- Start the engine
- Turn the wheels to full lock on both the left and right several times, checking the fluid level and keeping it filled to the "cold fill" line.
- Observe the reservoir. If it is full of bubbles, continuing turning the wheel until the bubbles stop. Then, fill to the "cold fill" line.

That's it - you've completed replacement of your A/C compressor! If you are replacing other components of your A/C system, do that next, otherwise, move on to Recharging the A/C System.
Recharging the A/C System
If you purchased (or already had) all of the tools mentioned above to do this job, then you're ready to recharge your A/C system. The process takes about 2 hours from start to finish, but a lot of that is wait time - to make sure the system isn't leaking before you fill it with refrigerant. The entire process is outlined here:
Charging the A/C System on a 1st Gen Tacoma (or 3rd Gen 4Runner)

And with that, you're done! Button up anything that's still not put together on the truck pat yourself on the back for a job well done. It wasn't that hard, with the right tools now, was it? 
Question about draining the Denso compressor. Denso says the new compressor, already
comes filled with the correct amount of oil. If I drain it, I do not want to refill with too much. I will if you think in doing so will remove old stale oil. It does seem that 110cc
is alot. Should I refill, with amount that has been removed? Just trying to get it done
properly. Thanks.
Hey David, Sorry for the slow reply, I've been out on the trail the last several days. As far as draining and filling the compressor goes, it seems like a good idea to me. My Denso instruction sheet, and the Toyota Factory Service Manual, both said to do this (though another part of the Denso sheet also stated that the correct amount was in the compressor, as you've noted - I found it a bit confusing). Anyway, it was easy enough to do that I figured a few minutes doing it wouldn't hurt.
I will mention that The FSM calls for 125cc of PAG oil in the compressor. Because you can't get 100% of the oil out of the compressor when you drain it, and overfilling the oil can lead to poor cooling, I find that adding about 110cc to the compressor results in about 125cc in total. And, when I drained the compressor, I got significantly less than 110cc out of it - I got like 75cc as I recall. So, that suggests to me that it didn't have as much as it needed/was speced to have by Toyota. Hope that helps! ?
Thank you for getting back to me. Not sure where to start, so here goes. When I swapped out the compressors, the old one had about 1/4 ounce { 7.4cc } of some goldish brown ugly fluid. { not good } I decided to do a complete overhaul. Compressor, Evap core unit with Expansion valve, Condenser, Receiver { dryer } Condenser to dryer hose. The other few hoses, I want to just clean, do you think some brake cleaner, and compressed air, would do the job ? Back to adding pag46 oil to the system. Nothing will have any oil now, The compressor is used to circulate the oil through the system, and is kept in the units to use. Is what the compressor had in it enough for all of the components. I can't find in my manuals anything about starting from the beginning, on how much should be in the system at start up. I have small little testers that measure the amount of oil in the system, but you have to run the system for a few minutes before using them. I don't want to burn something up, if there is not enough. I would like to be close to the amount I need before testing. Any help would be great, thank you.
Hey David, sounds like you were a bit low on oil in the compressor! Good job getting everything taken care of.
For cleaning the hoses (lines, really I suppose) - your method seems just fine. The key bit is to be sure that you dry out whatever solvent you use (brake cleaner in your case) before putting everything back together. You can do that by blowing compressed air through the lines for a few minutes after cleaning them out. Also - acetone is a good solvent to use for this, and might be a bit cheaper. Whatever you have around though, really.
And, for putting PAG46 oil into the system - you really need to add it to each component as you go; don't just add all of it to the compressor. I cover the amounts in the various guides here, but here's a quick reference:
Compressor: 125cc
Evap Core: 40cc
Receiver/Dryer: 20cc
Condenser: 40-50cc
You also want to replace and oil every single o-ring in the system, as these are places where leaks commonly occur. And of course, adding a bit of UV dye (or using PAG46 with dye in it) can be a good idea as well so you can more easily find leaks should you have any in the future.
Hope that helps!
Thank you for the totals for each unit { very helpful } I continue to follow all of your pictures and diagrams to complete this overhaul. There always somethings i seem to miss, like a AC pressure switch. I will get a new one coming. You mention about adding pag46 oil to the system, but some of the pictures show the ND8 OIL. If you think the ND8 OIL is better to introduce to the new system, and will help it last longer, and perform much better, I will do it. Filling each piece with said amount, there are multiple ports per unit. Is there a specific port ? Or either, as long as it gets added ? Thanks for the video. I will have to view it a few more times.
No problem at all, I love chatting about this stuff, and I'll try to answer any questions I can, to the best of my ability! ?
Regarding the oil - ND8 oil is equivalent to PAG46, so use whichever is easier to get your hands on. You can even use both if necessary. I've updated the "parts" lists in each of the posts to note this equivalence, as it is a good question.
When filling the components with oil, it probably doesn't really matter that much, but I always try to put the oil into the intake port, and then sort of slosh it around to distribute it through the component. You don't need to worry about getting it to "come out the other side," but by putting it into the intake, it will get distributed through the component when the system is engaged.
Hello, I am back. So I finished the complete overhaul of my system, after I finally received all of the components. Added all components with correct amount of PAG46 oil. Connected everything to torque specs. Pulled a vac. about -29 for about an hour. I could not get any of the 12oz cans of 134A to flow through the hose of the manifold. I tried 2 different manufacturers { Johnsens and Chemours } I am guessing it is me that is doing something incorrectly. So I took the truck to have it filled, at a shop. They filled the system to what they said was the proper pressure. 53 low 275 high. My chart says the high should be higher about 330 it was about 105 degrees ambient temp. Anyway the system does blow cold. But even on the freeway around 65mph I can only get the temp gauge to read maybe 56 degrees, I was hoping for somewhere in the low to mid 40's I am hearing a slight whirling noise while engaged, from inside the truck while driving. I have these testers for the oil volume. It seems to be a little low, so I think I might need to add some oil. How much, not sure. Also can I add oil while pressurized, Or do I need to remove the refrigerant first, then start over. Thanks.
Hey David, Glad to hear you got everything installed, sorry to hear you aren't seeing the temps you were hoping for. Personally, I'd say that if you're seeing mid-50s out of the system when it is 105 outside, you're probably pretty good. I'd wait for some cooler outside temps to see if you get into the 40s inside, before you do anything.
As for adding more oil - my (non-expert) understanding is that more oil won't make things cooler. In fact, it will have the opposite effect - too much oil can make it not cool as well; the oil is really just about lubricating the components. I'm actually considering removing some oil from my system to get it to cool a little better.
If you do need to add (or make any change) to the oil, you'll need to take the truck in and have it depressurized first. (Note: it's illegal to vent the system to the atmosphere in order to depressurize it.) The one exception to that is that if the system is already low on pressure, you can add some refrigerant+oil at the same time, but there's no way to get oil in by itself without opening up the system again.
Thanks for getting back to me. Yes I would say that mid 50's is a lot better than it was. I am just basing it on my wife's 2009 highlander, with the same temp gauge, is reading 41 on the low fan setting, not even moving, waiting at a light. Seems like mine could be better, something's up. Also my wife, and daughters camry, with the humidity we have been having will drain moisture from the evap on to the ground, and mine has no drainage at all. Yes I don't want to add to much oil, but I don't want that whirling sound to be my compressor slowly melting.
Yeah, I hear you. I've experienced similar to you - my '97 4Runner definitely blew colder than my Tacoma blows. Given that they are essentially the same system, I can't really explain it either.
If you're in a situation where you don't really know whether you have the right oil/R134A - it might be a good idea to take it to a Toyota dealer if you haven't already (not sure where you took it before) in the hope that they could get it to be better. Generally though, my understanding is that more oil doesn't make things cooler; more R134A does. Whatever you do, I'd LOVE to hear the rest of the saga - what works and what doesn't. I'm sure that knowledge can help me and others in the future! ?
As for drainage - the Tacoma evap core drains through a little tube in the firewall that exits on the passenger side (behind the glove box) and it drips onto the exhaust pipe there. As such, it almost never leaves a puddle on the ground, since it immediately evaporates. However, it's easy to check if it is clogged, and easy to unclog if it is.
If it's clogged, your carpet in the passenger footwell will be wet after you run the A/C.
To unclog the tube (or verify that it's not clogged) you can push a coat hanger about 4-5 inches into the drain, and here's what you are looking for on the engine side, as well as the location of the drain in the cab, which is right at the carpet line in the foot well.
Sorry for the long reply, hope it helps!
Thank you for all of your help. I am going to a different place this time. Hopefully learn something new. I will keep you posted.
Question, hopefully you still tend to this page. With the new compressor requiring 110cc of oil, the new evaporator 40cc, condenser 40cc, and receiver asking for 20cc that’s roughly 210cc or 7.1fl oz of oil across the system. I couldn’t find in the FSM the cap for AC system oil just 21.16oz of refrigerant, does 7.1 sound right for oil?
If I just install the parts and have my shop charge the system they can add oil but will it spread as even as if I poured these amounts individually?
Lastly 21.16oz of refrigerant is separate of the 7fl oz of oil or r those quantities measured together?
Hey Z, those oil numbers are correct. Remember, the oil in the system is what keeps everything lubricated, even though it seems like a lot.
And the other thing to be aware of is that the compressor will come with oil in it. The amount of oil in it is rarely the correct amount, so it is very important to drain the compressor as much as possible prior to installation and then add 1/2 to 3/4 of the specified oil to the compressor.
Adding oil to each component is best, but it can also be done when the refrigerant is added, it will just take longer to make its way through the system. And, you never want to run the compressor without plenty of oil in it.
Lastly, the oil and refrigerant amounts are Measured separately.
Hope that helps!
Sweet thanks for the response dude, taco just hit 20yrs n the ac pulley went out so i decided to swap the ac sys completely so I really appreciate the knowledge.
Thanks turbodb I have a tundra that Im currently installing new EVAP, expansion valve, dryer, condenser, lines and compressor. I've been searching all over on the quantity of pag oil and how to put it in. I'm going to get the syringe as you suggest and pour it in each component at the measurements you recommend. Thank you so much
You're welcome! It'll be great to have your A/C working again, if your truck is anything like mine! Just in time for summer, too! ?
I referenced you a d linked your page on my Tundra build thread here: https://www.tundras.com/threads/new-to-me-2001-4x4-5spd-v6.124851/page-11
Again, thankyou turbodb for the information you provided
Thank you for this. Just a quick question. How do I know if I need a new compressor? My A/C belt broke and I cannot turn the compressor by hand. Is this normal or should I be able to spin it freely. Thanks
Hey Jerry, there should be resistance when you turn the pulley on the A/C compressor, but you should be able to turn it by hand (which is how you get oil into a new one during installation). If you can't, it sounds like you may be due for a replacement. Do you know what caused the belt to break -- could it have been the compressor seizing and then the belt heating up and snapping?
I think that’s exactly what it was because that thing doesn’t move at all. I’m thinking about replacing it but looks like a shop will have to drain and refil it. I was running for a while without the A/C belt and it was running fine. This whole thing just sounds expensive
Yeah, the truck will run fine without the A/C belt, but you won't have any A/C (or defrost). It's definitely not a cheap job due to the drain/refill of the refrigerant and the work needed to pull out the compressor (you have to remove the PS pump as well). If you have (or even if you have to buy) tools and can do it yourself, you'll save quite a bit using this guide and picking up the listed parts.
(You can "rent" - for free - the gauges needed when charging the A/C system, so you'd only have to pay to have it discharged at a shop, which is not too expensive.)
I don't know if this is what caused it but it looks like a wire was shredded on the compressor. It looks like a ground wire. This thing is totally beat up.
Any idea how much it would cost to drain?
I've never had mine drained (mine had a leak, so drained itself), but a fill was $69 at the dealer, so I'd imagine a drain is about the same or maybe a little less. I'd just call around a couple places and they should be able to give you a quote over the phone, since it's a standard operation.
I paid $38.10 at Midas to get my A/C system evacuated (back in August of 2022).
I just got it done for 20 bucks. When I was replacing my condenser and drier, I stripped some threads so waiting on some parts. Then ima refill it myself. Thank you for the reply.