November 23, 2018.
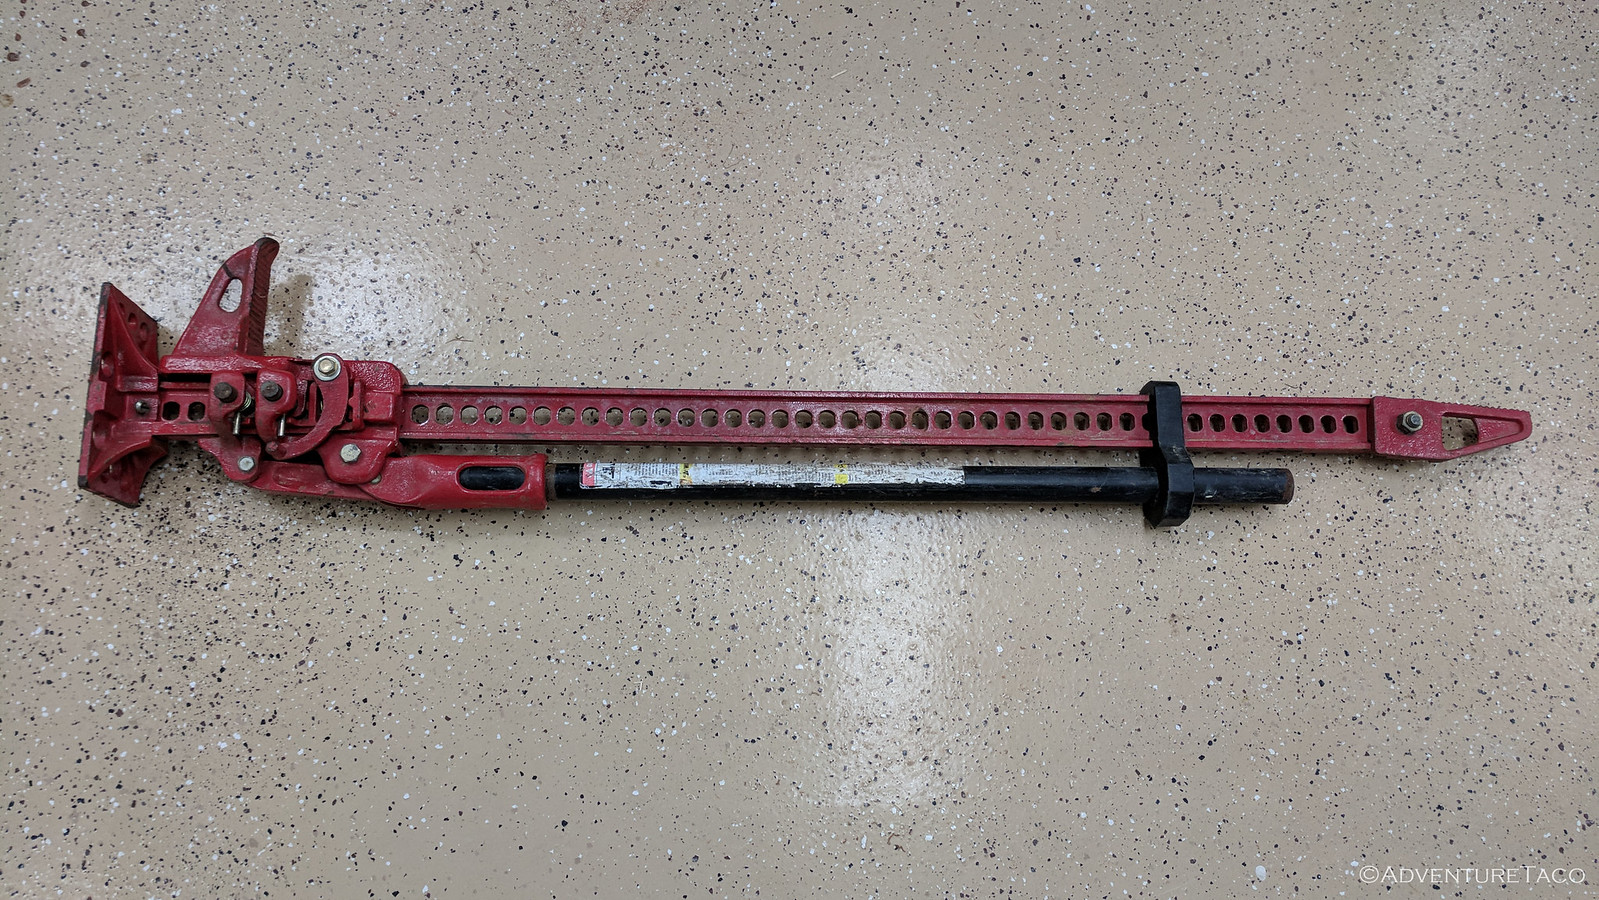
It's amazing how many Hi-Lifts I see driving around the Seattle area. If you didn't know better, you'd think all these folks took their vehicles off-road! Of course, for the majority of them, the Hi-Lift has achieved maximum purpose and use in it's mounting and visible expo factor on the vehicle - but for some, it becomes a critical safety and recovery tool when on an adventure.

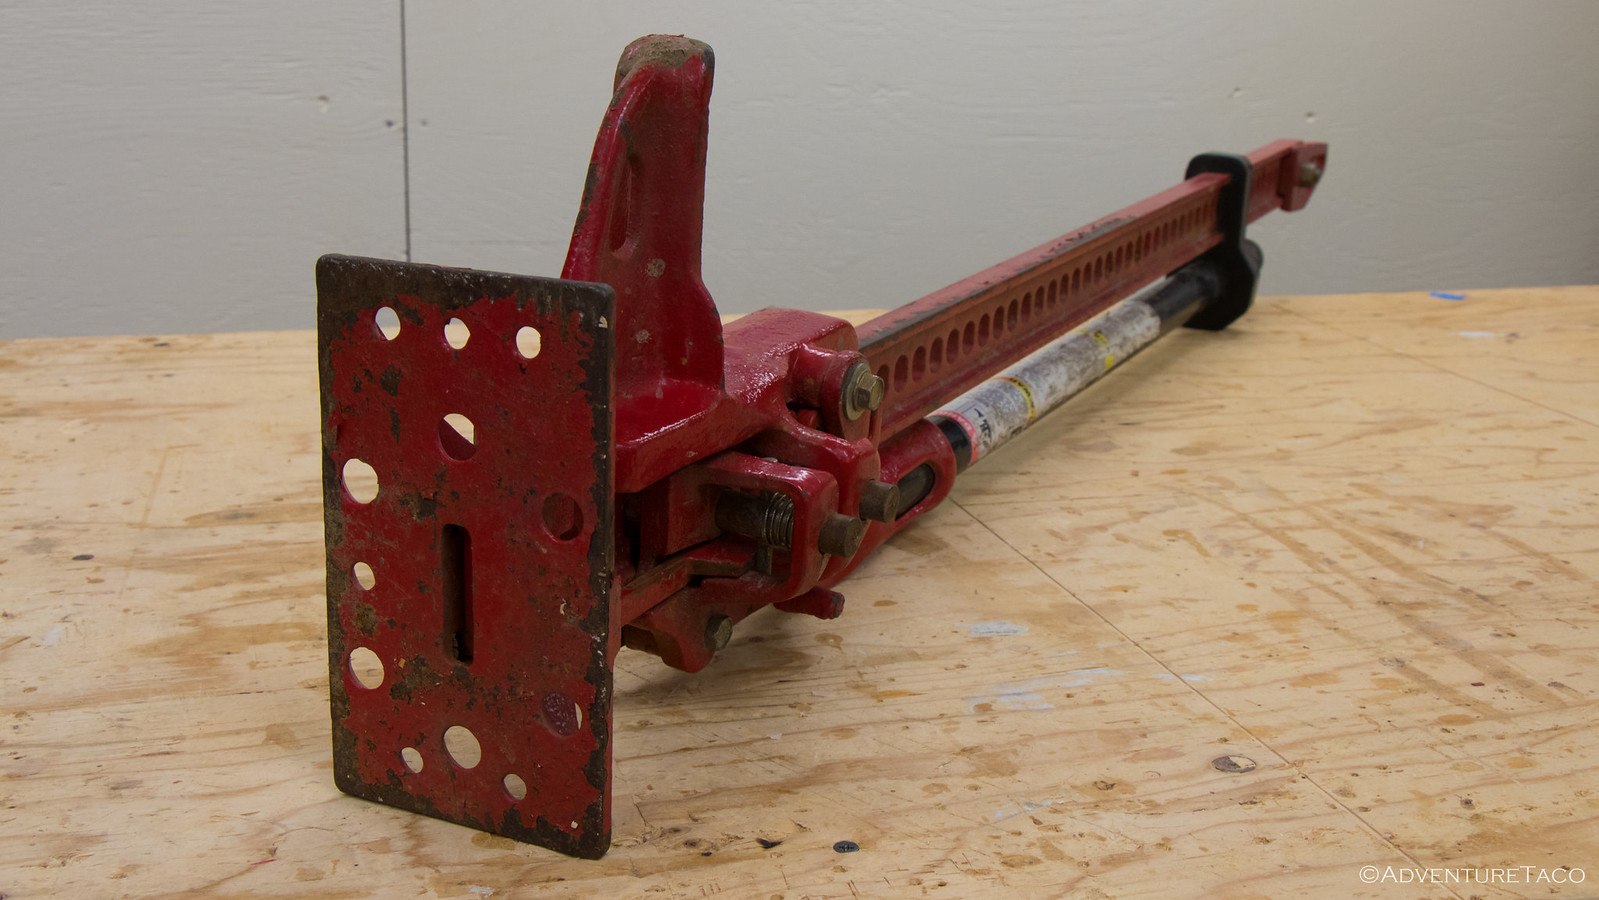
For those folks, it's important to keep the Hi-Lift in top shape. That means servicing it on a regular basis, ensuring that all parts are in good working order - free of oxidation, rust, and grime picked up on the trail. Having not serviced my Hi-Lift since I got it, the last few times I (and others) have had to use it, it's been stiff and harder to work than it should be.
I figured a cold, rainy day was as good as any to bring it back to smooth operation.
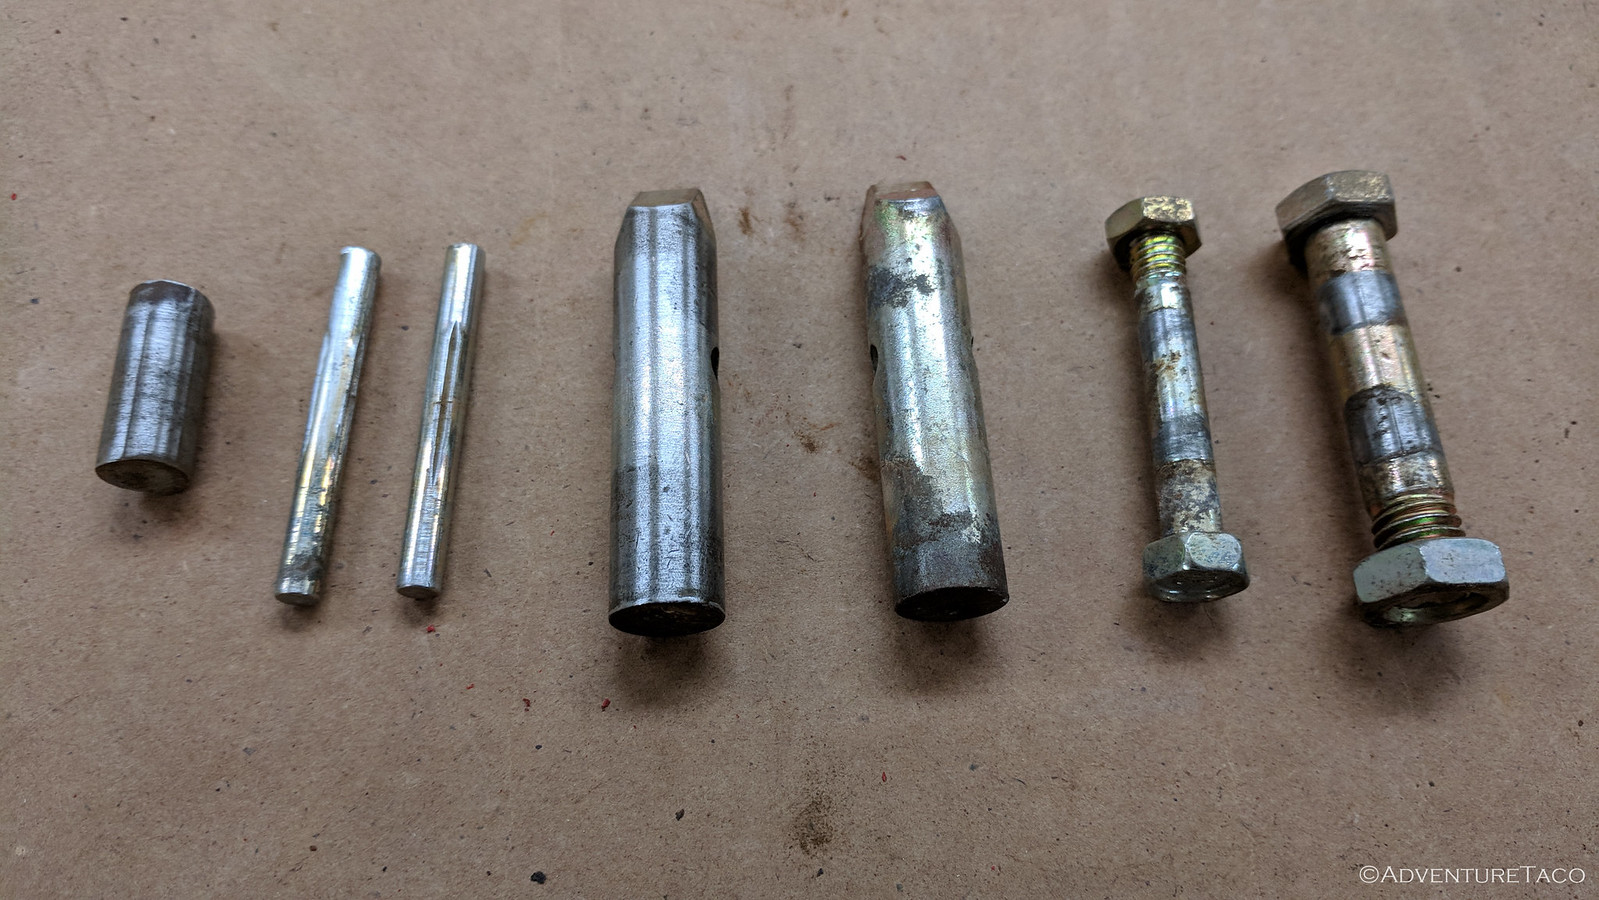
Depending on the state of your Hi-Lift, the first order of business may be to purchase a Hi-Lift FK-1 Fix-it-Kit. Relatively cheap, I'd recommend this if you have any concern that your shear bolt is bent, either of your climbing pins are significantly gouged, or if the springs have weakened.
In addition, you'll need a set of sockets (or couple of crescent wrenches), hammer, punch, pliers, and some steel wool to complete the refresh. Of course, add rust-converting spray paint to that list if you want to repaint any part of your Hi-Lift.
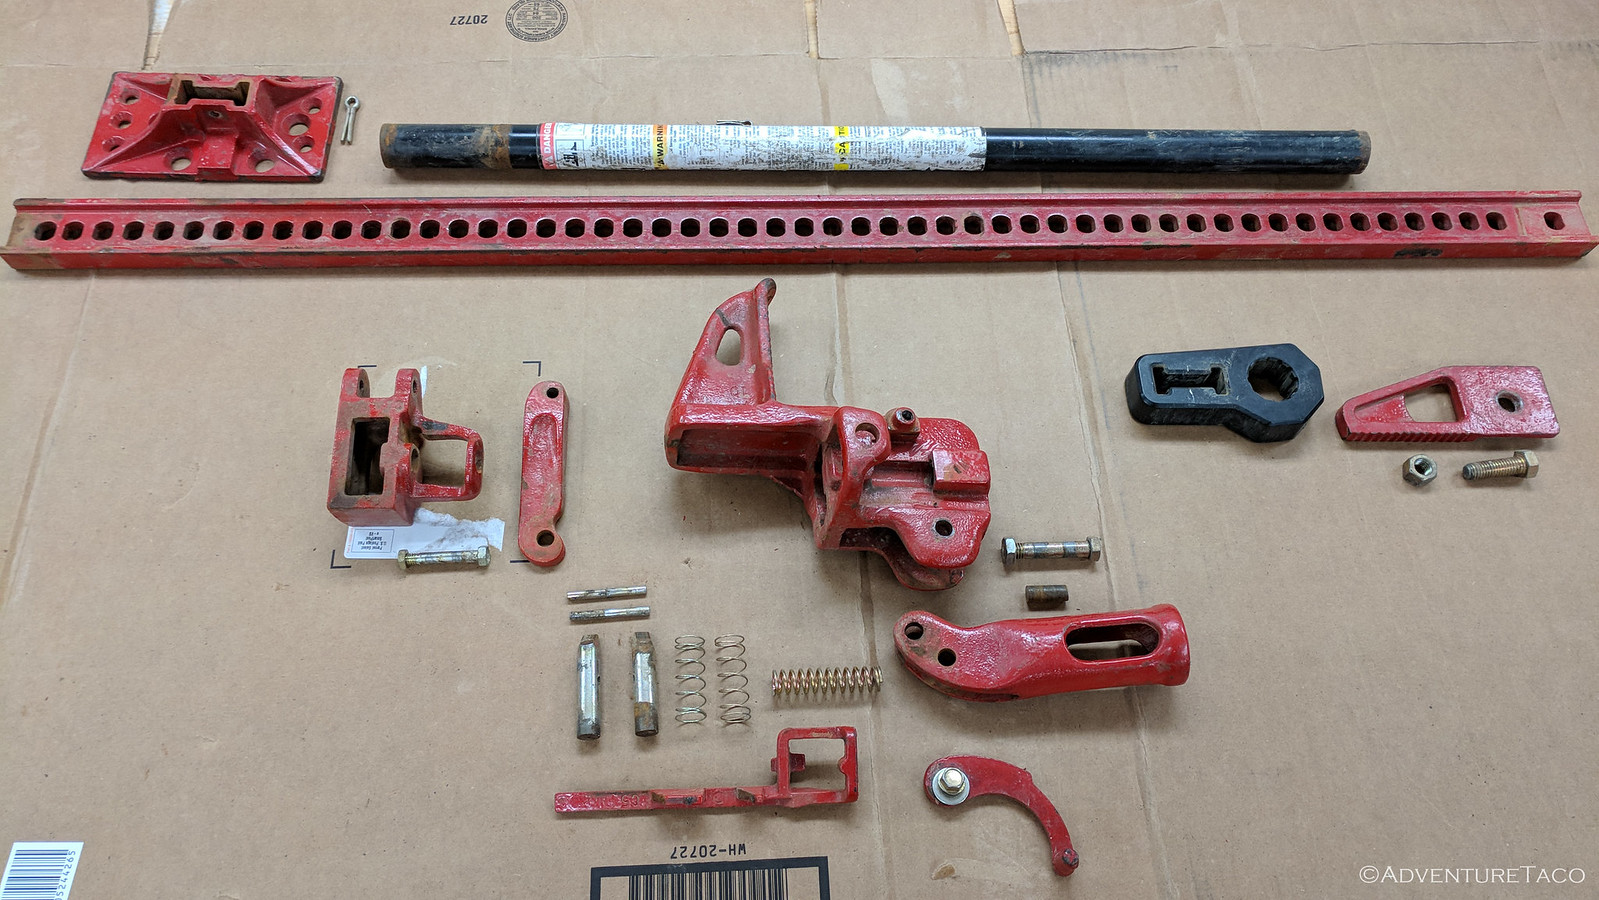
Start by removing the foot, handle, and top clam-clevis from the Hi-Lift using pliers on the cotter pins holding the foot and handle, and wrenches to remove the nut/bolt holding on the top clevis. Then, remove the head from the bar by simply sliding it off the bottom of the bar.
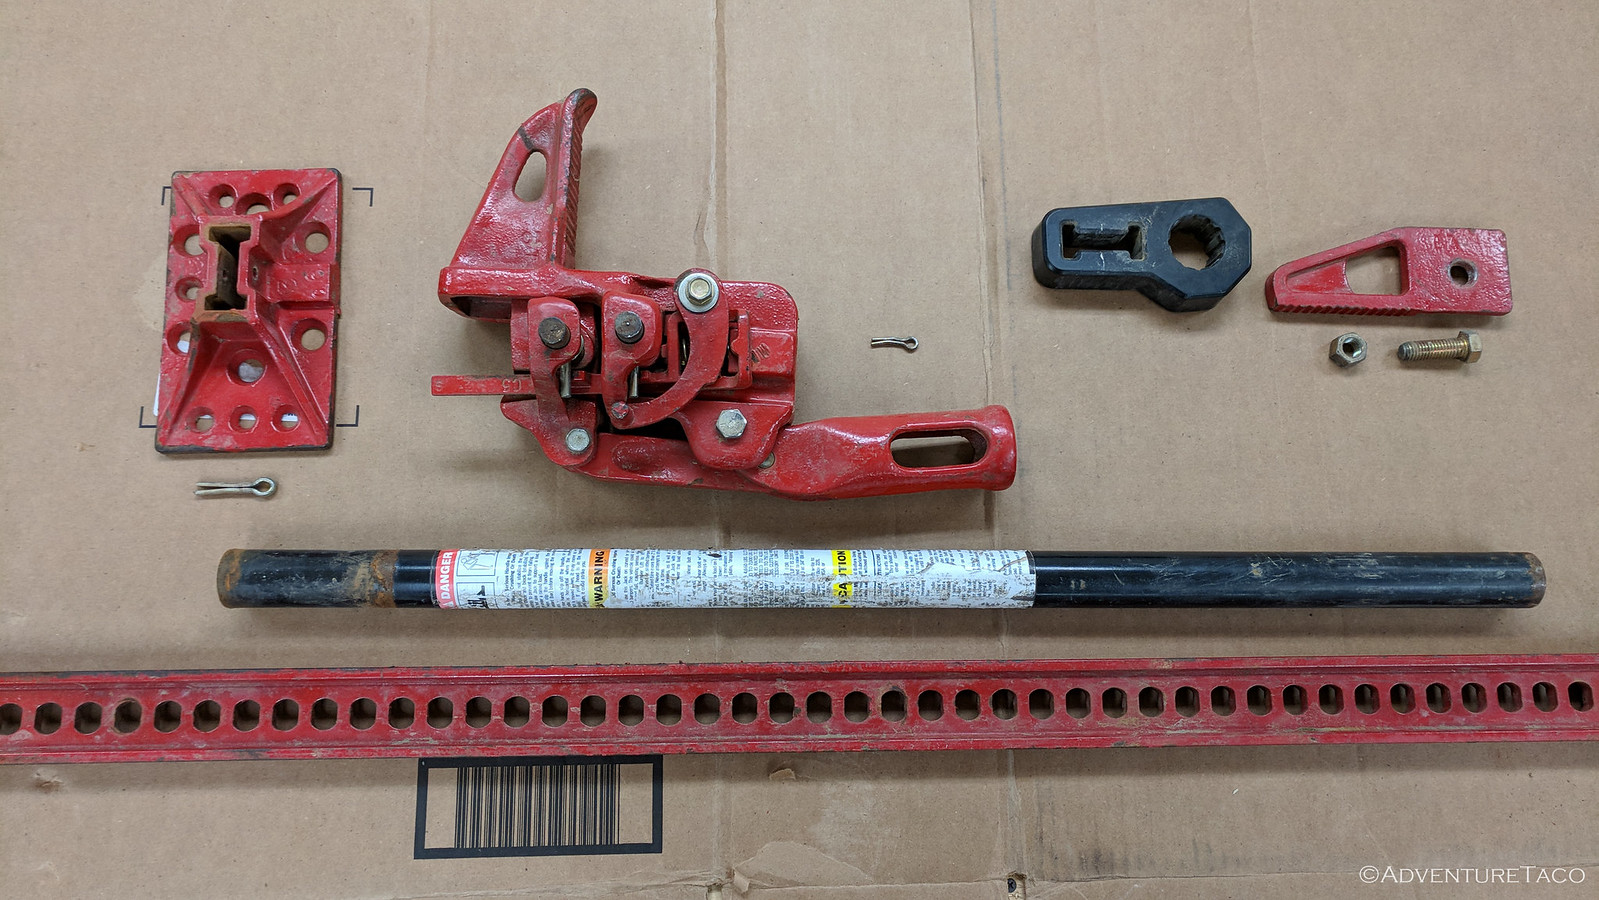
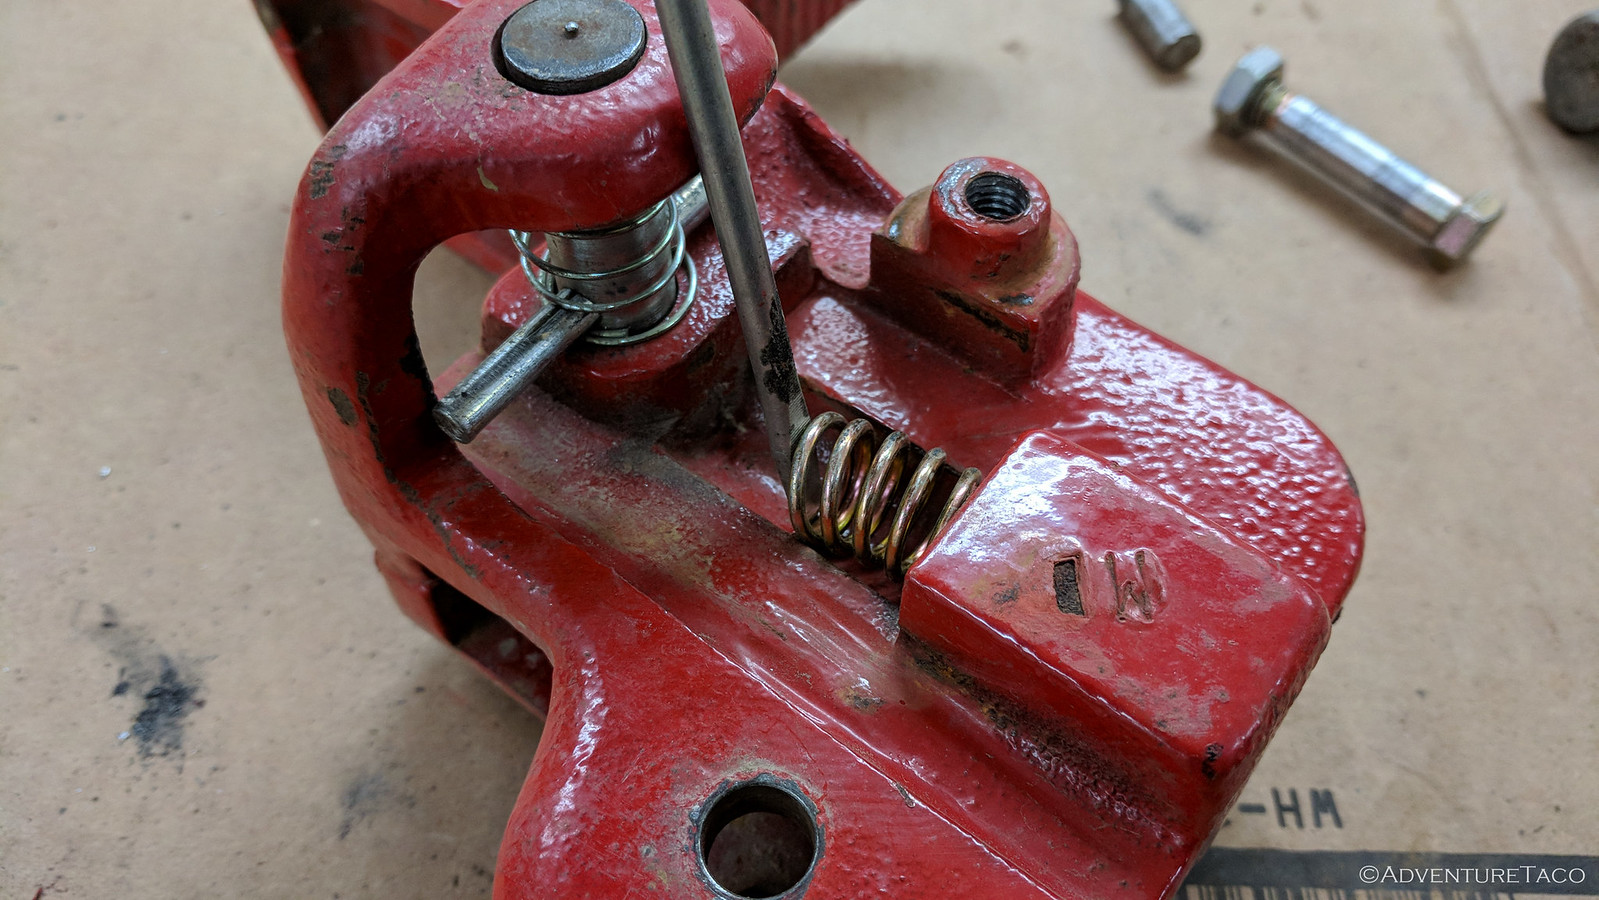
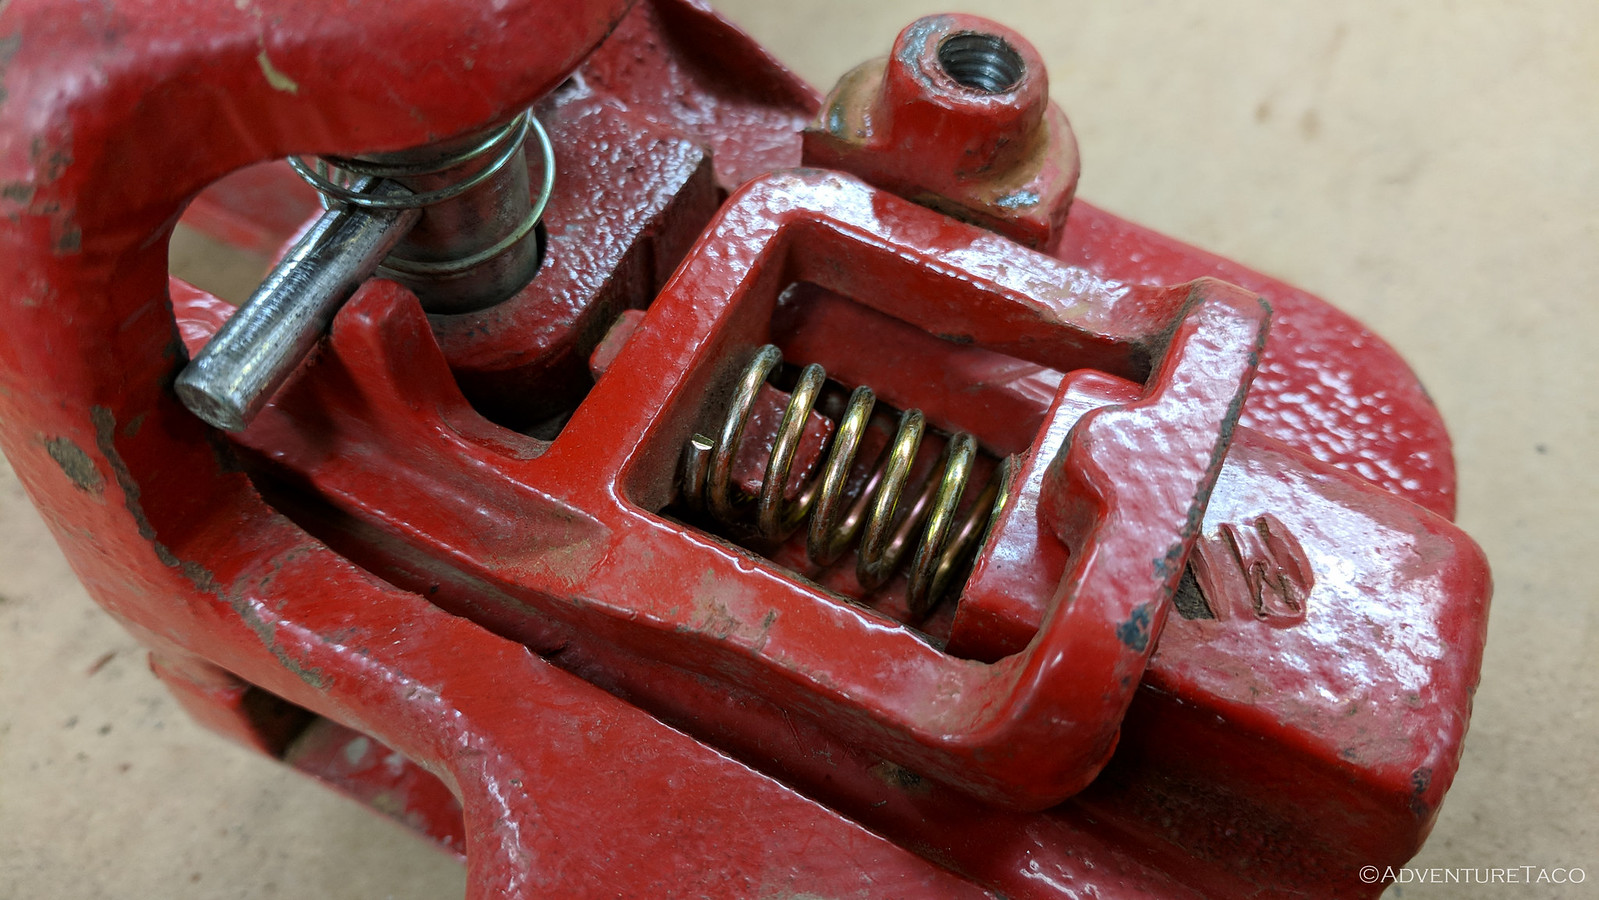
Next, remove the climbing pins and springs from the head using a hammer and punch to tap out the cross pins. Be careful, since those springs will fly a good distance, lodging themselves just out of reach under your heaviest cabinet.
Next, remove the bolt and washer securing the reversing lever with a 1/2" socket or wrench. This will expose the reversing switch and spring, which you can finagle out of the head.
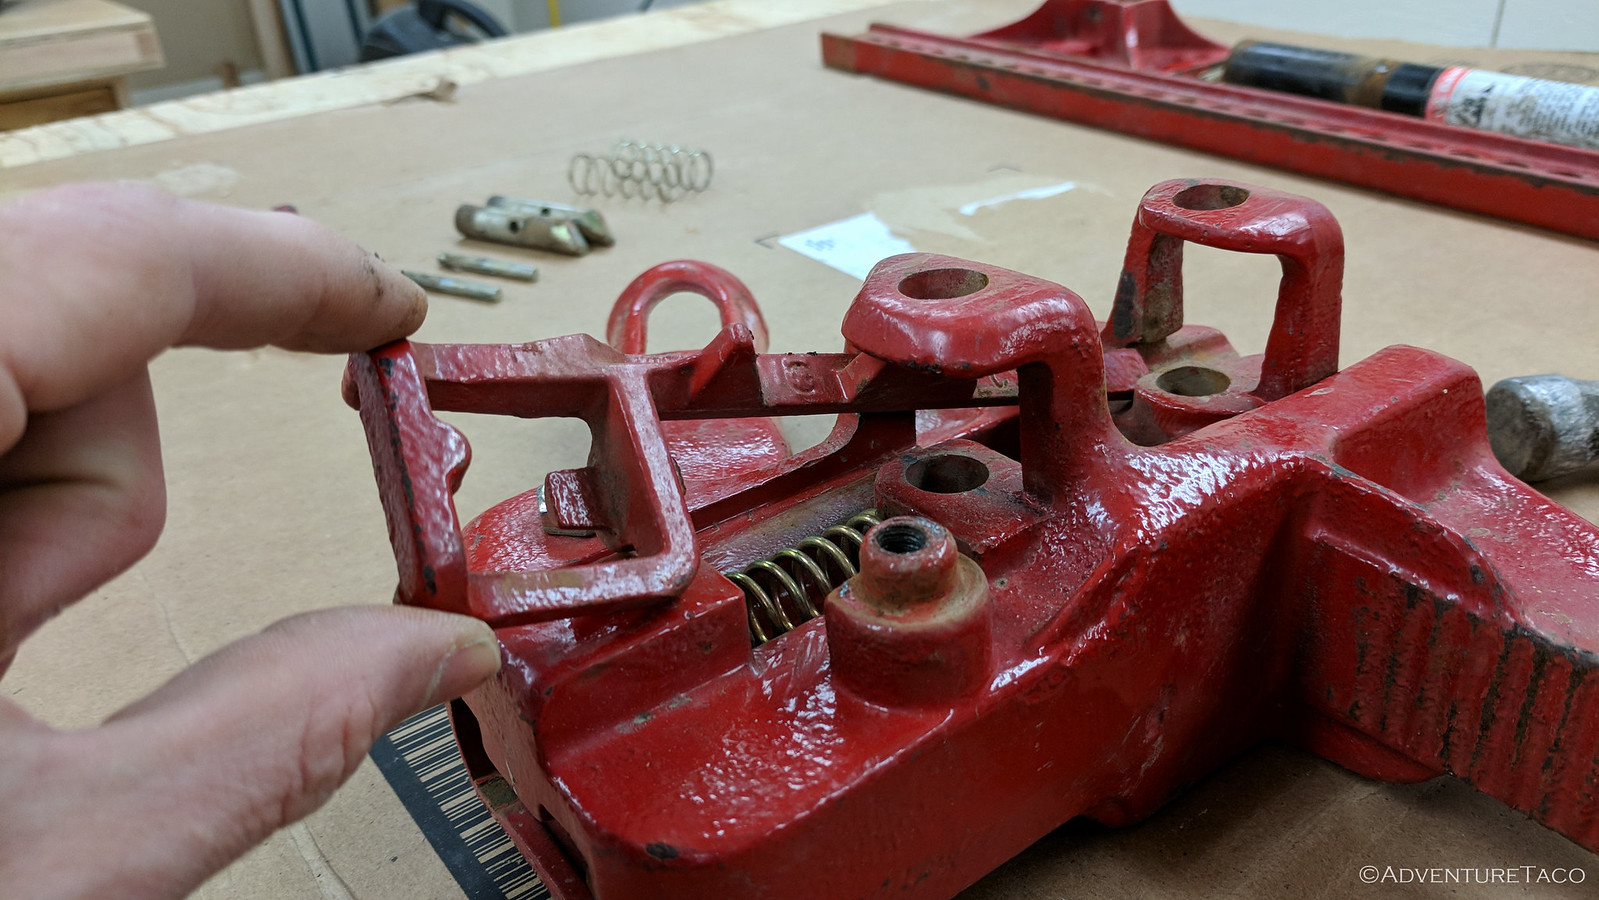
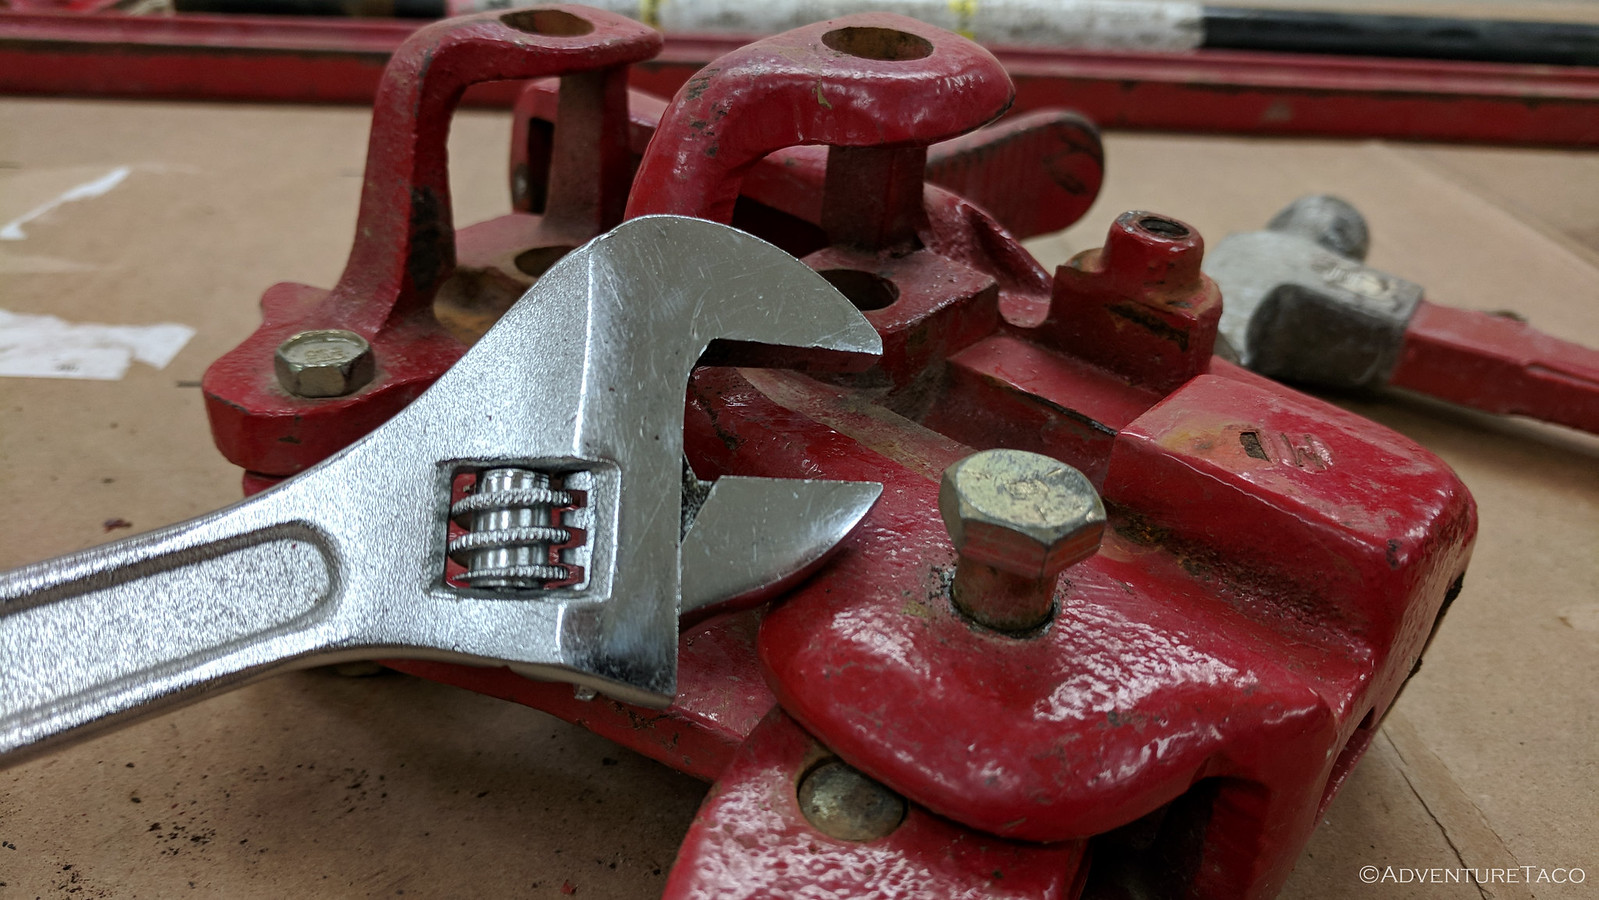
With the pins and switch removed, the last two bolts are the bolt that holds the handle to the head, and the shear bolt that holds the pitman lever to the small runner. Removing these will also allow removal of the pitman pin (mine slid right out, but you may need to tap it out).
When you're done, you will have all of the parts of your Hi-Lift, and are ready to clean them up. You can go as crazy as you'd like at this point. A wire wheel can get built-up gunk off of the Hi-Lift, as can a stiff brush or even some WD-40 and towels. If you are going to paint, remove as much as possible and wipe down with alcohol; painting when dry.
If you aren't going to repaint (I decided not to because, well, I don't care if it's shiny), it is important to refresh several of the components/mechanisms. Using some steel wool, remove any oxidation, rust, or other debris that has built up on the climbing pins, springs, cross pins, and their mating surfaces in the Hi-Lift head.
Note: Be careful with the cross-pins. They rely on friction to hold themselves in the climbing pins. If you remove the burrs, you may need to slightly deform them prior to re-assembly so they don't fall out on the trail.
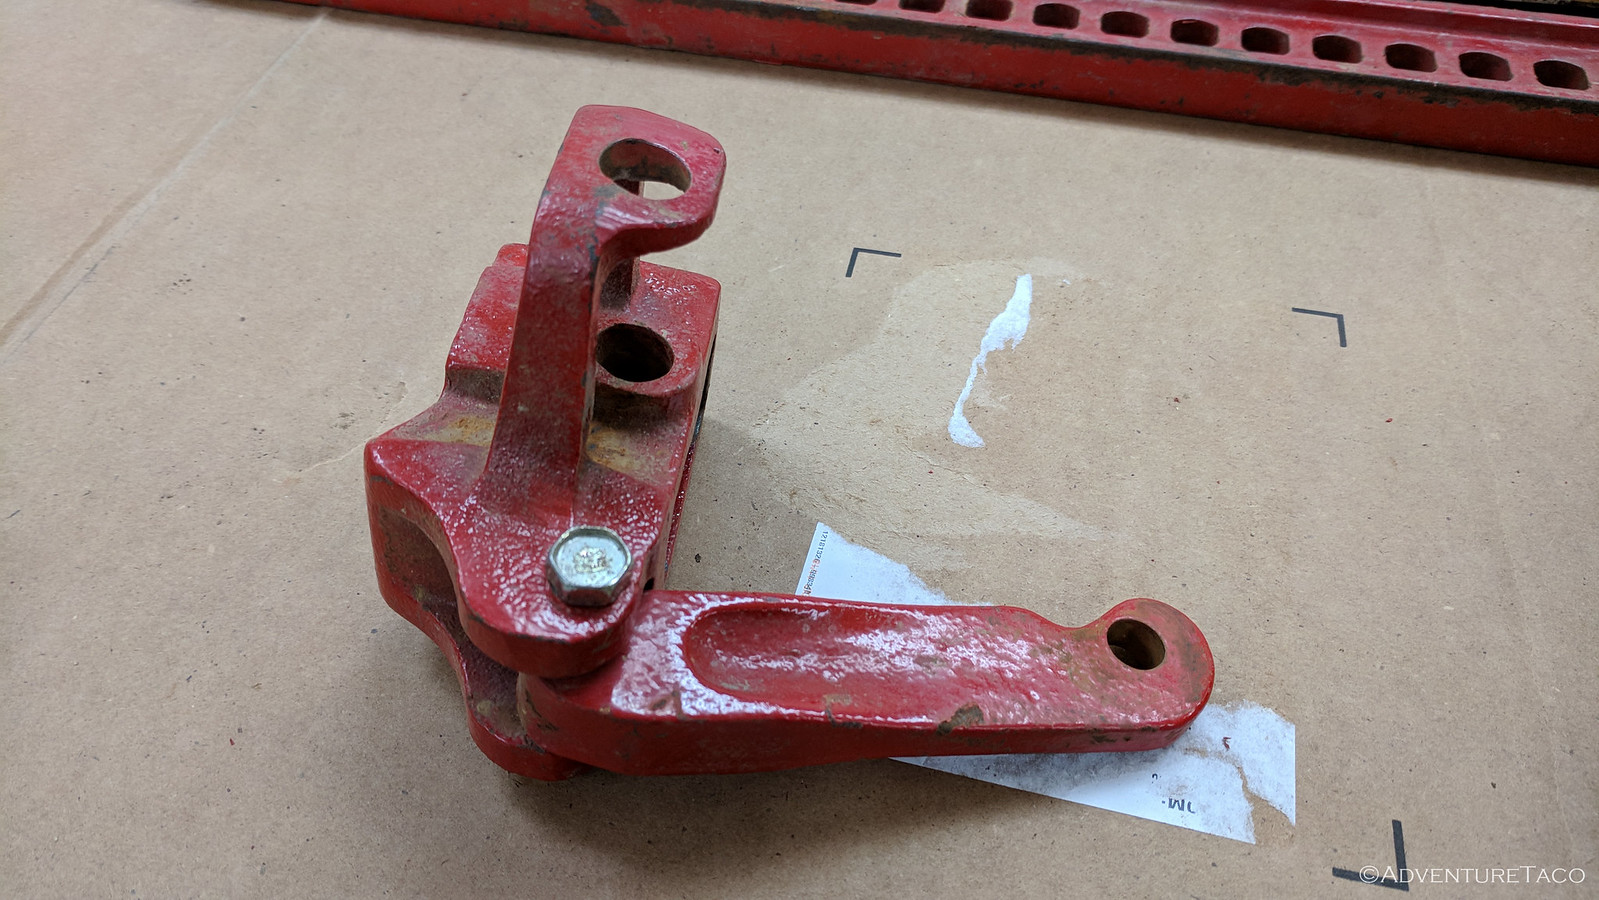
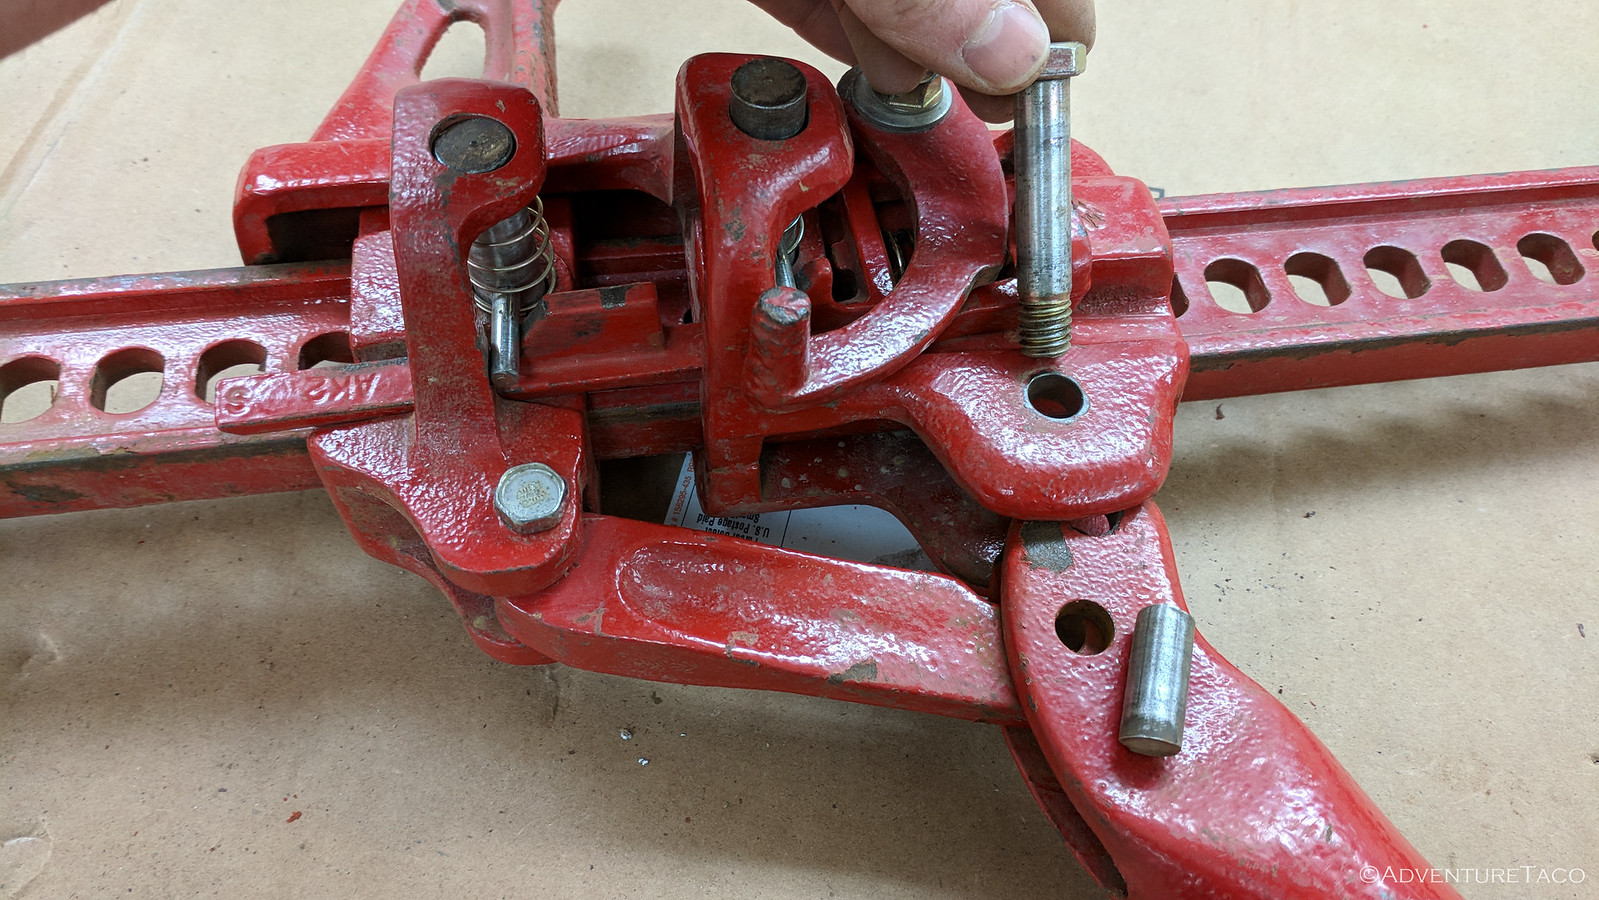
With the movable surfaces cleaned (and optionally painted), it's time to re-assemble. This is mostly the reverse of disassembly, with a few noteworthy tricks. Start by reattaching the clevis to the small runner using he shear bolt.
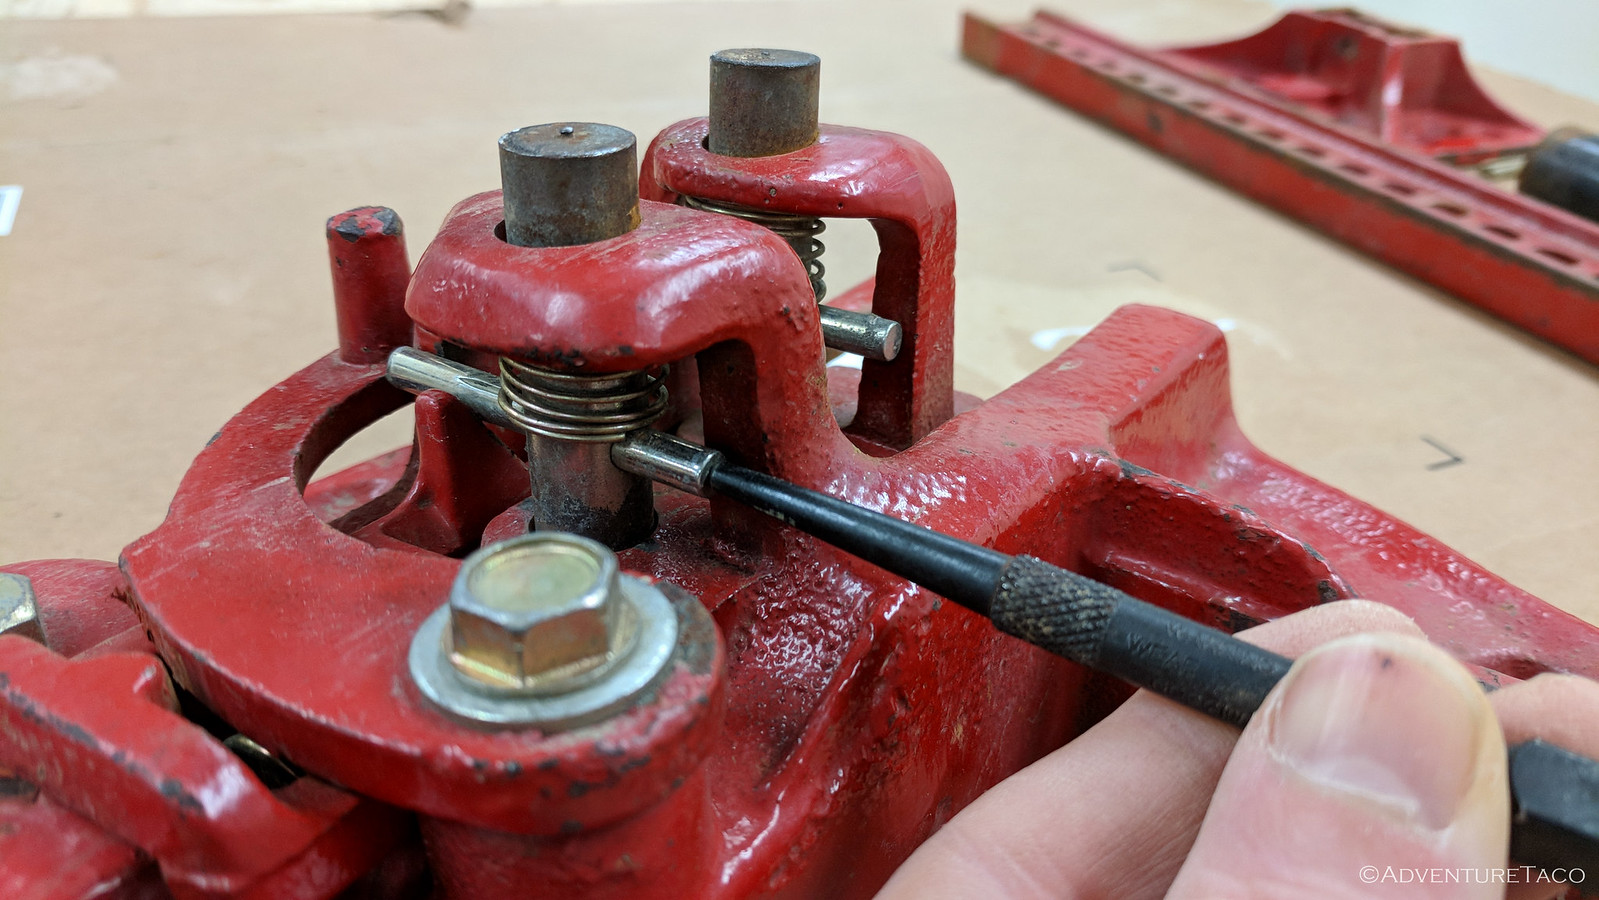
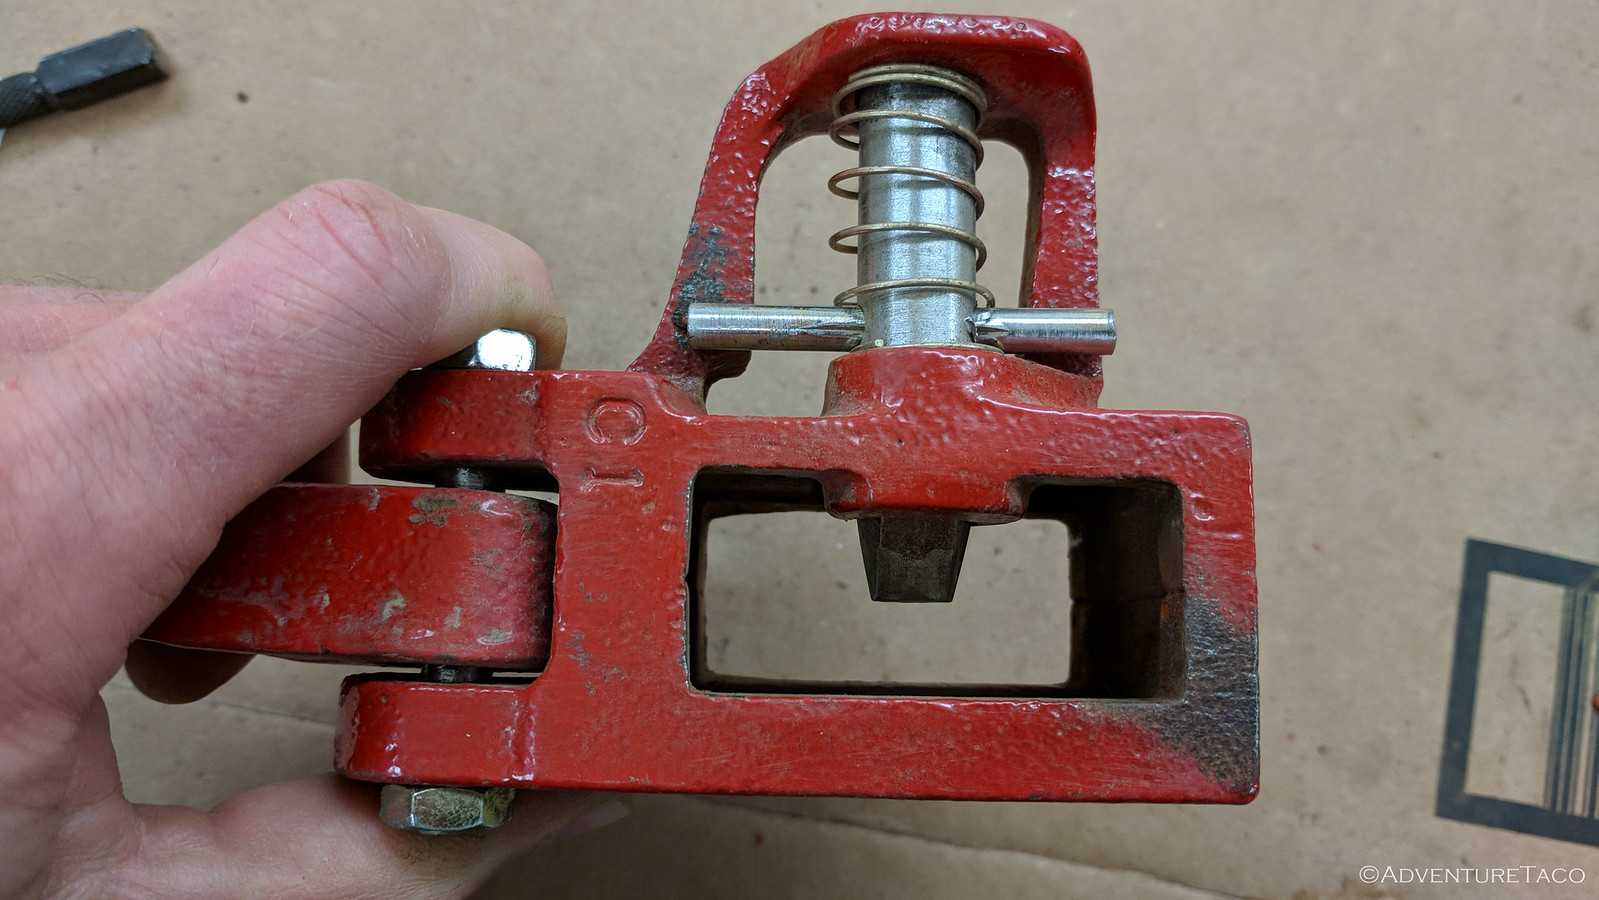
Next, install the climbing pins (bevel up - towards the reversing lever) and springs by inserting them in their respective holes and tapping the cross-pins into position. Be careful here to not catch the spring as the cross-pin exits the far side of the climbing pin.
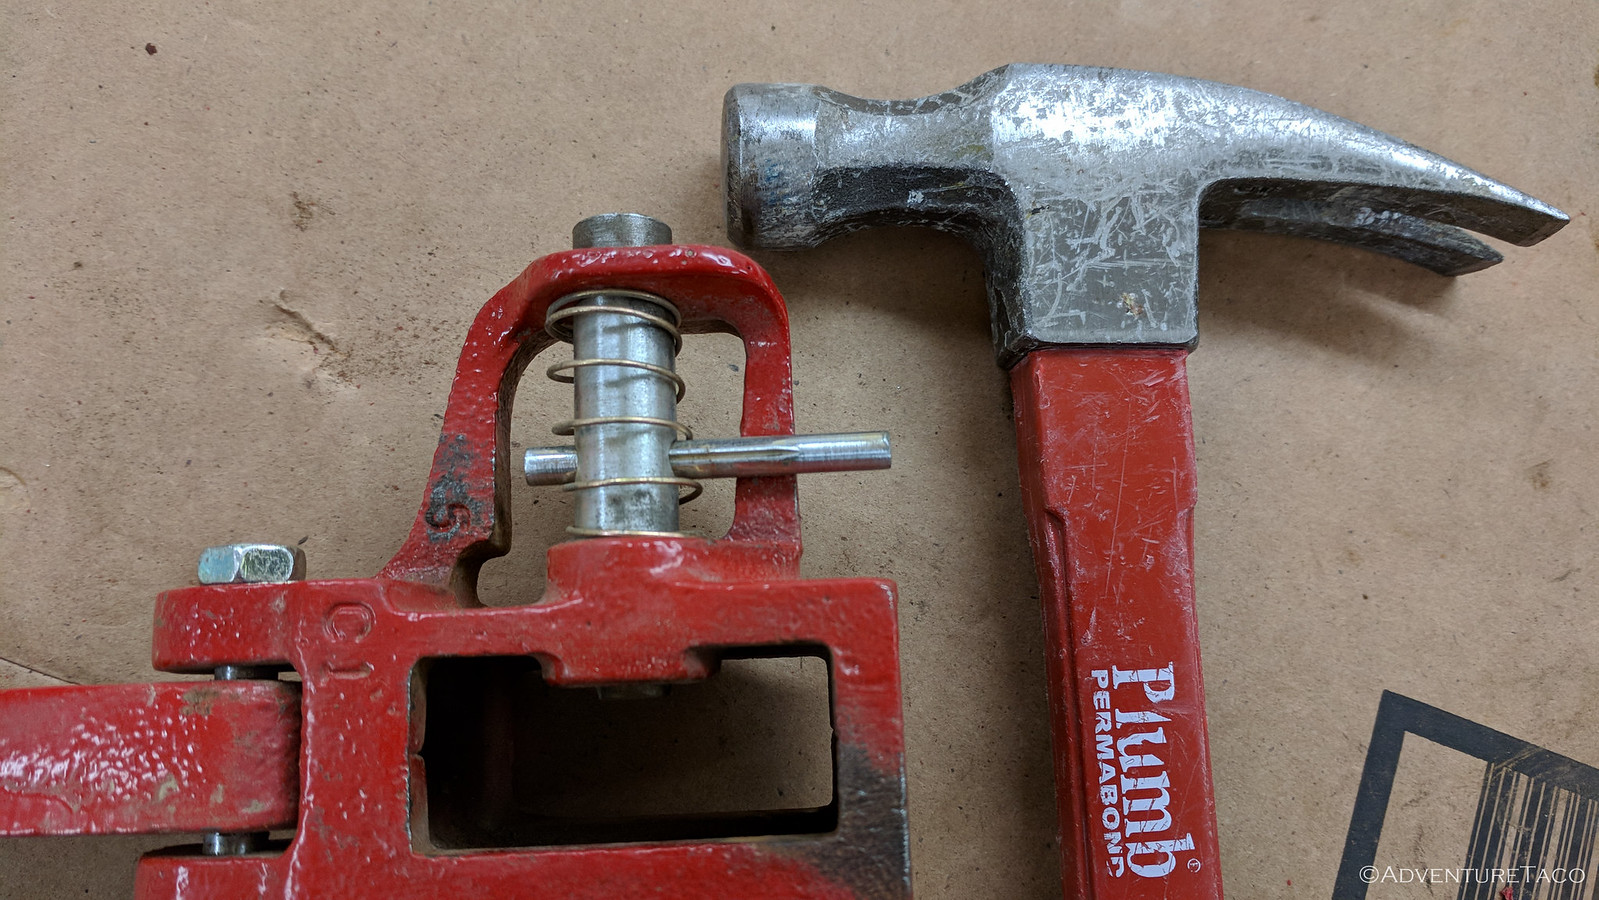
Once you've tapped the cross-pin into place, rotate the spring so that only the last coil of spring is under the cross-pin.
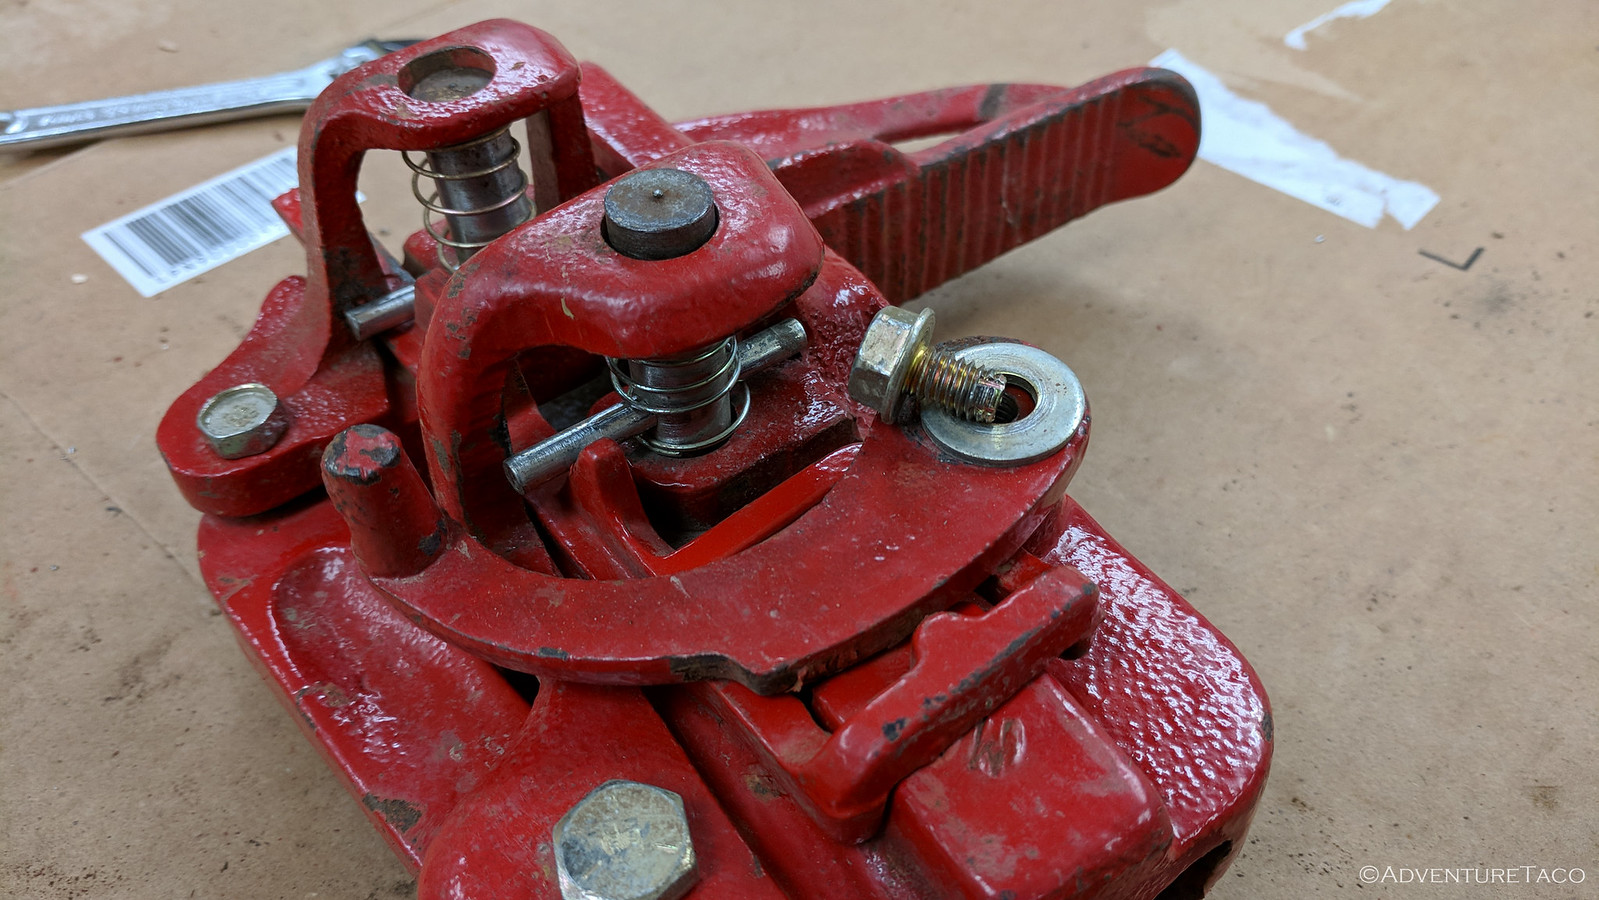
Inserting the reversing spring and switch is the next order of business, and requires some fussing, as the spring is quite stiff. Use a screwdriver or other lever to compress it while you slide the switch into place.
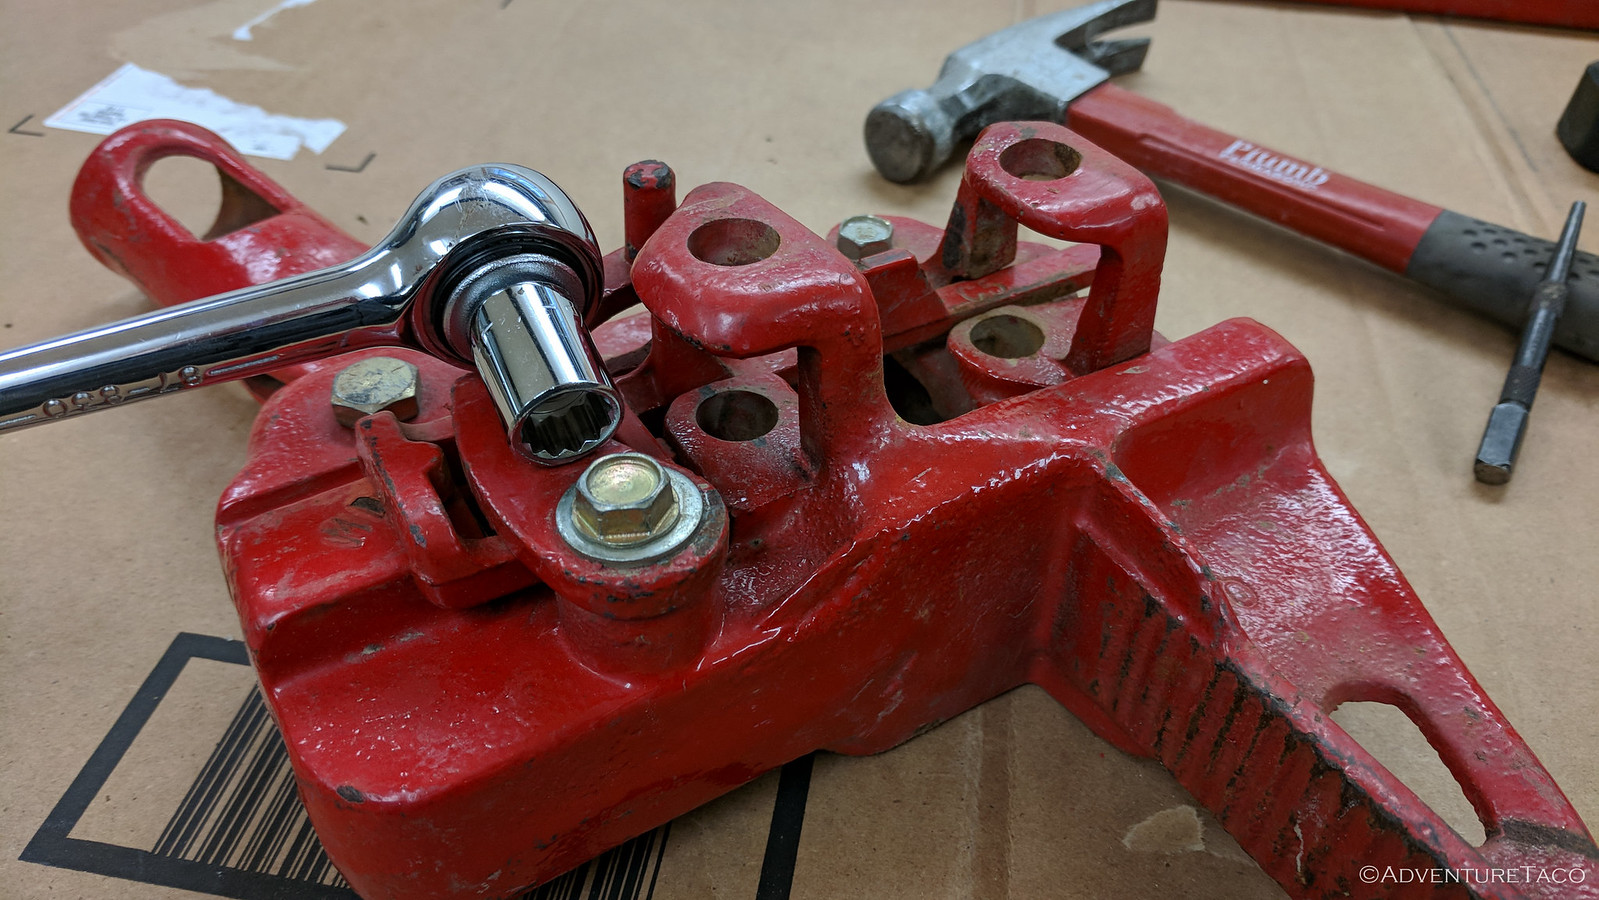
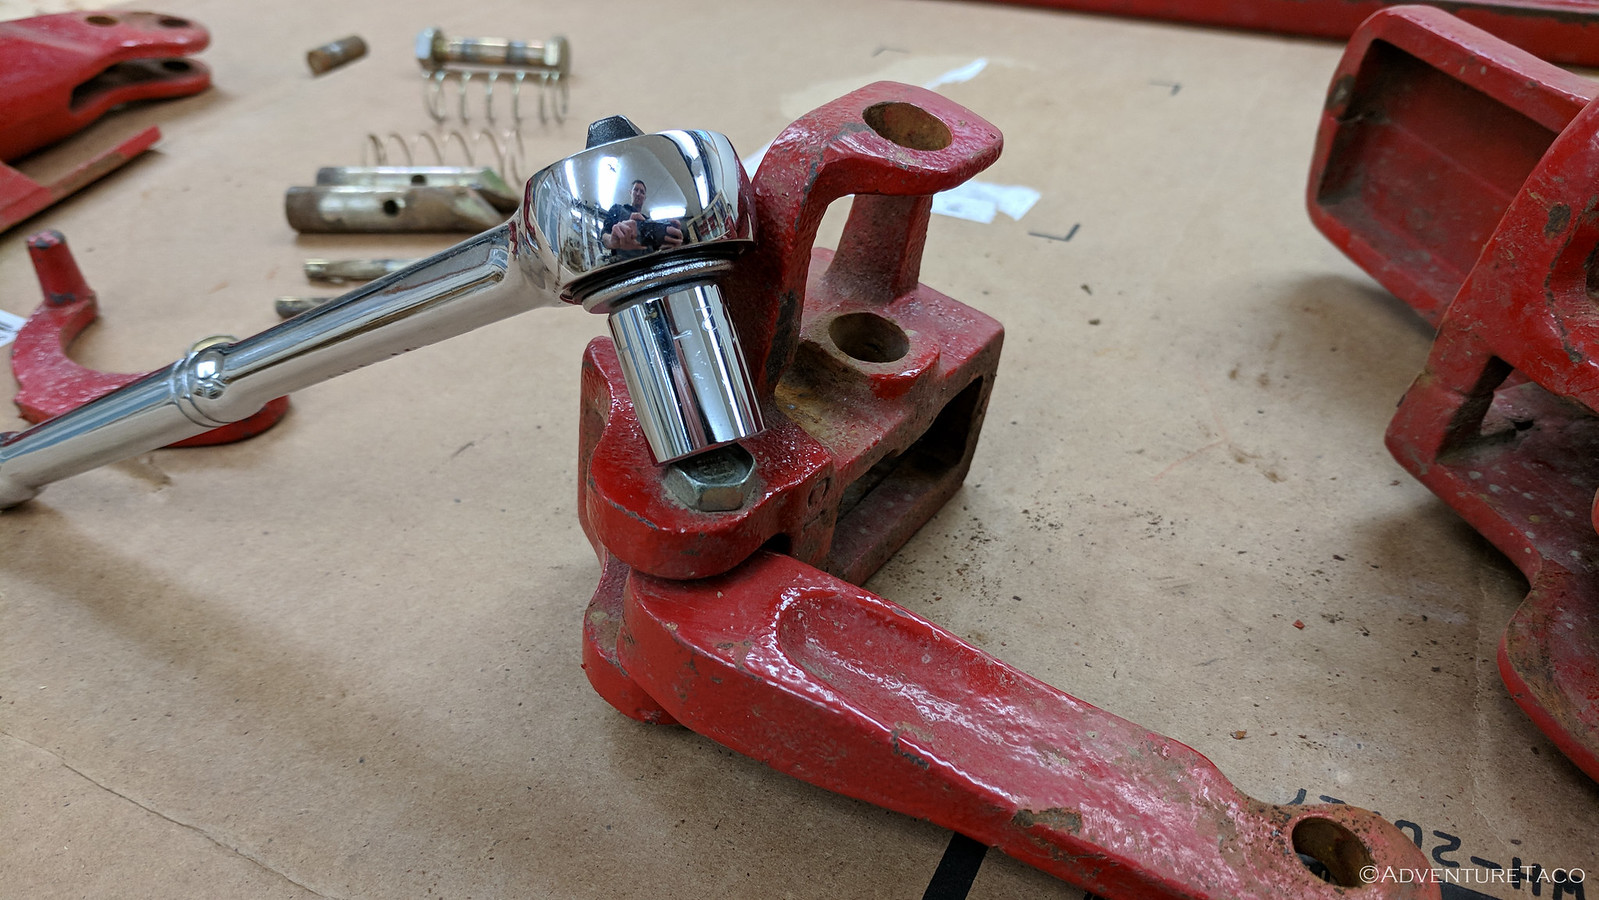
Nearing the home stretch, install the large bolt that connects the pitman (and small runner) to the top of the Hi-Lift head. Do this by inserting the pitman pin first, and then the large bolt. Note that this bolt is inserted from the same side as the reversing lever, so that the lever clears the bolt head (it won't clear the nut if installed backwards).
Finally, complete re-assembly of the head by installing the reversing lever using the original bolt and washer.
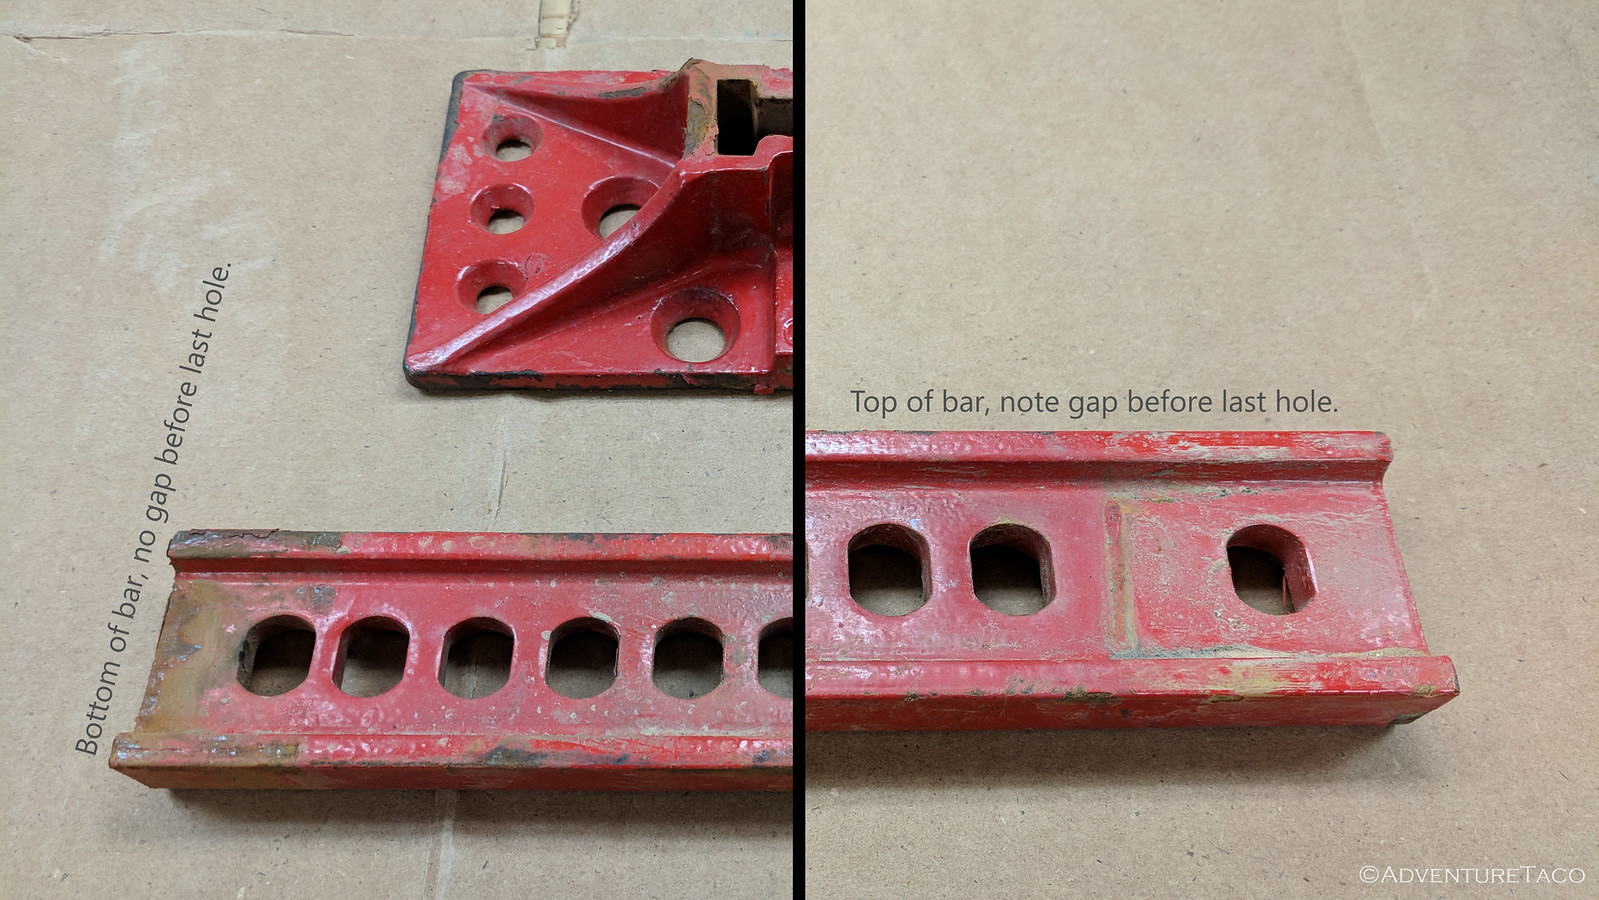
With the head complete, slide it onto the bar (which is directional - the foot goes on the end without additional space between the holes). To do this, you'll need to hold the climbing pins "up" so they don't impede progress.
Note: It is possible to do this by rotating the climbing pin springs to raise the cross-pins; but remember to immediately rotate them the other direction to correctly seat the climbing pins when done.
Reassemble the foot and handle by re-inserting the appropriate cotter pins, and the top clevis using the original nut and bolt.
At this point, it's important to lubricate your Hi-Lift. Using a white lithium grease, light penetrating oil, or a silicon or Teflon spray at the following points. Do not use motor oil or grease:
- Steel bar: Keep the front and back edges of the steel bar lightly lubricated and free from dirt and rust.
- Pitman pin: Keep the pitman pin lubricated or it will damage the handle socket and pitman.
- Shear bolt: Keep the shear bolt clean and lubricated to keep it from wearing out.
- Climbing pins and springs: Keep both climbing pins and springs lubricated and free from dirt and rust.
Now it's time to test the Hi-Lift. Make sure that the reversing latch is latched (up) and just operate the jack - it should move up smoothly. Carefully release the reversing latch - keeping all body parts free of the jack, since the Hi-Lift head should go crashing to the floor (since there is no weight on it). Test again with a load to ensure correct function.
That's it! With half an hour or so, a Hi-Lift can be fully serviced and ready for more reliable service. Doing so regularly can also alert you to stresses in components such as the shear bolt - a good thing to keep an eye on in the shop, rather than on the trail.
I was hoping you could share some of the ways you have used your high lift jack on the trail aside from normal stuff like leveling your vehicle when camping and lifting for repairs, etc.
I've only ever used my Hi-Lift for normal stuff, and even then, mostly for buddies trucks when things go wrong, since my jack is relatively easy to access on the side of my bed rack, and theirs are generally stowed away in a kit somewhere deep in the bed. Certainly I've heard that they can be used in a pinch as a winch, etc. but in my experience, there's generally a better tool for those types of jobs, and the inherent danger of a Hi-Lift should usually make it a last resort for anything not jack-related. Have you used yours in innovative (or unusual) ways?
I do love that Ridgeline with the Hi-Lift on it. Is there any hard point that you could actually use to raise the vehicle? I also have only used my Hi-Lift for routine stuff but have friends that needed to be creative and shared stories. One close friend that lived in Grand Junction was out with his brother getting firewood in the spring. They were up at Pinyon Pine elevation on a BLM or Forest Service road that was partially frozen and partially rocky. They hit a thawed section of crowned clay road with a low area to one side that had been bladed in to promote water drainage and his Hi-Lux slid right off the road. It was miserable because they were in standing water. He rigged off a stout tree with chain, a kinetic strap and other line to the Hi-Lift with the other end strapped to the center of the frame on the side of the truck so they could pull at 90 degrees from direction of travel. His brother alternated between low range reverse and 1st gear spinning the tires slowly and by putting strain on the kinetic strap with the jack they actually managed to slide the truck sideways back to the center of the road and by careful driving managed to get back to a rocky section and escape back to Grand Junction. I was with a friend that got his 4WD high centered on a big rock on the front differential. We jacked the front end up near the center of his bumper and actually pushed the front end sideways so the jack tipped over. Not very safe but it worked and we got him off without towing to minimize further damage to the vehicle. Fortunately no 90W leakage and the damage to the housing did not cause ring gear interference so he still had workable 4WD because we had some hairy stuff to travel to get back out. Also, I have heard of people breaking tire beads by jacking against rock sliders or hard bumpers to put big internal patches on tires that had been severely damaged. Something must have already been wrong with the spare.